Have you ever seen a giant beam of light shooting into the sky in Minecraft and wondered what it was?
That’s a beacon, one of the most powerful items in the game!
It gives you awesome powers like super speed or strength, but only if you’re close enough to feel its effects.
Getting a beacon to work right can feel a bit tricky.
You have to build a pyramid, pick your powers, and figure out how far they actually reach.
This guide will walk you through everything, step-by-step, so you can easily calculate your beacon’s range and choose the best effects for your base.
Key Takeaways
- A beacon’s power, range, and available effects are determined by the size of its pyramid base.
- A max-level (Tier 4) beacon has a 50-block range and unlocks secondary effects like Regeneration or Level II powers.
- You must ‘pay’ with an ingot, diamond, or emerald to activate primary effects like Speed, Haste, or Strength.
Understanding Minecraft Beacons: Basics, Tiers & Activation
Ever stumbled upon a towering beam of light in Minecraft and wondered what it was?
That, my friend, is a beacon!
Beacons are some of the most powerful and sought-after blocks in the game.
They provide amazing status effects to players within a certain radius, making everything from mining to fighting much easier.
But how do they work? Let’s break down the basics, from crafting to activating their full potential.
Crafting Your First Beacon
Before you can enjoy those sweet buffs, you need to build a beacon. The beacon block itself is a precious item.
To craft one, you’ll need three main ingredients:
- One Nether Star: This is a super rare drop from defeating the Wither boss. It’s quite a challenge!
- Three Obsidian: You can get this by mixing water and lava.
- Five Glass: Smelt sand in a furnace to get glass.
Getting a Nether Star is often the trickiest part.
If you’re planning an adventure to the Nether, you might find our guide on how to build an efficient Minecraft Nether Hub useful for getting around.
The All-Important Pyramid: Tiers and Materials
A beacon block doesn’t just work on its own. It needs to be placed on top of a pyramid made of specific mineral blocks.
These aren’t just for show- they power the beacon! The bigger and more complete your pyramid, the stronger your beacon’s effects.
You can use four types of valuable blocks to build your pyramid:
- Iron Blocks
- Gold Blocks
- Diamond Blocks
- Emerald Blocks
You can even mix and match these materials within the same pyramid. For example, you could use iron for the base and diamond for the top layers.
Understanding Beacon Tiers
There are four different tiers of beacon pyramids, each requiring more blocks than the last.
Each tier increases the range of the beacon’s effects and unlocks more powerful options.
Here’s how the pyramid tiers break down:
A bar chart showing the total number of blocks needed for each beacon pyramid tier: Tier 1 (9 blocks), Tier 2 (34 blocks), Tier 3 (83 blocks), Tier 4 (164 blocks).
As you can see, building a full Tier 4 pyramid is a huge commitment. It requires a lot of mining and smelting!
For example, a Tier 4 pyramid needs a total of 164 blocks. Since each block is made from nine ingots or gems, that’s 1,476 raw resources!
Let’s look at the structure and block count for each tier:
| Tier | Layers | Base Size (blocks) | Blocks per Layer | Total Blocks Needed |
|---|---|---|---|---|
| 1 | 1 | 3×3 | 9 | 9 |
| 2 | 2 | 5×5, 3×3 | 25, 9 | 34 |
| 3 | 3 | 7×7, 5×5, 3×3 | 49, 25, 9 | 83 |
| 4 | 4 | 9×9, 7×7, 5×5, 3×3 | 81, 49, 25, 9 | 164 |
Activating Your Beacon’s Powers
Once you’ve built your pyramid and placed the beacon block on top, it will emit a powerful light beam into the sky.
This means it’s active, but it’s not giving you effects yet! You need to configure it.
Right-click the beacon block to open its interface. Here, you’ll see slots for primary effects and secondary effects.
Primary Effects
The primary effects are the main buffs the beacon provides. Which ones you can choose depends on your pyramid’s tier:
- Speed: Walk faster.
- Haste: Mine faster.
- Resistance: Take less damage.
- Jump Boost: Jump higher.
- Strength: Deal more damage in combat.
To activate an effect, you need to place an ingot (Iron, Gold), a Diamond, or an Emerald into the payment slot. The resource is consumed.
Secondary Effects
Once your pyramid reaches Tier 3, you unlock the ability to choose a secondary effect.
At Tier 3, you can add Regeneration (slow health recovery) as your secondary effect.
At Tier 4, you get an even cooler choice: you can either select Regeneration OR upgrade one of your chosen primary effects to Level II.
This means you could have Speed II, Haste II, or any other primary effect at a super-powered level!
The specific effects and their levels depend entirely on the tier of your pyramid.
Do you usually aim for a Tier 4 beacon, or do you find smaller ones meet your needs just fine?
Primary and Secondary Beacon Effects Explained
Imagine your Minecraft beacon as a powerful hub for your base. It doesn’t just shoot a cool beam into the sky.
It also gives you and your friends special abilities, known as beacon effects.
These effects can make you stronger, faster, or even help you heal. There are two main types: primary and secondary effects.
Understanding Primary Effects
Primary effects are the first set of powers your beacon can grant. They become available as you build up your beacon’s pyramid base.
The more powerful your pyramid, the more options you’ll unlock. You can only choose one primary effect at a time from a given pyramid level.
Here are the primary effects you can choose from:
- Speed: This makes you move faster. It’s super handy for exploring or getting around your base quickly.
- Haste: Ever wanted to mine blocks faster? Haste is your answer! It speeds up your mining and digging.
- Resistance: If you’re tired of taking too much damage, Resistance reduces all incoming damage. It’s like having a constant shield.
- Jump Boost: This allows you to jump higher. Great for parkour or reaching tricky spots.
- Strength: Boosts your melee attack damage. Perfect for fighting off monsters or in a player-versus-player (PvP) scenario. A strong hit can make all the difference, and improving your attack speed, often measured in clicks per second, can combine with this effect for maximum impact.
When you activate your beacon, a special menu pops up. This is where you pick which primary effect you want.
The pyramid’s size determines which of these effects you can even see as an option.
Unlocking Secondary Effects
Once you build a full, max-level beacon pyramid, you unlock the ability to choose a secondary effect.
This is where your beacon truly shines! You have two powerful choices for your secondary effect:
- Regeneration: This effect slowly heals your health over time. It’s incredibly useful for surviving tough fights or just staying healthy while working.
- Level II Primary Effect: Instead of Regeneration, you can choose to upgrade your active primary effect to Level II. For example, if you chose Speed as your primary, you can make it Speed II. This makes the effect even stronger.
You can’t have both secondary options at the same time. You’ll need to decide if you prefer constant healing or a super-charged primary ability.
Think of it like choosing a superpower upgrade. Do you want to heal faster, or run twice as fast?
Pyramid Levels and Effect Choices
The size and number of layers in your beacon’s pyramid directly impact which effects you can select. Here’s how it works:
| Pyramid Level | Blocks in Base Layer | Total Layers | Primary Effects Available | Secondary Effects Available |
|---|---|---|---|---|
| Level 1 | 3×3 (9 blocks) | 1 | Speed, Haste | None |
| Level 2 | 5×5 (25 blocks) | 2 | Speed, Haste, Resistance, Jump Boost | None |
| Level 3 | 7×7 (49 blocks) | 3 | Speed, Haste, Resistance, Jump Boost, Strength | None |
| Level 4 | 9×9 (81 blocks) | 4 | All primary effects | Regeneration, or chosen primary effect at Level II |
To upgrade your beacon, you add more layers of full blocks of iron, gold, emerald, or diamond. Each layer must be a solid square.
It’s like stacking building blocks to reach new heights of power.
According to the Minecraft Wiki, a fully maxed-out beacon pyramid requires 164 blocks in total.
Understanding these effects is key to using your beacon strategically. Will you focus on mining efficiency, combat prowess, or overall survival?
How to Calculate Minecraft Beacon Range
Ever wondered how far your awesome Minecraft beacon effects reach? It’s not a mystery! Calculating your beacon’s range is actually quite simple.
The secret lies in the pyramid you build underneath it. The bigger your pyramid, the wider the area your beacon will cover.
Think of it like a speaker. A small speaker has a limited sound range. A bigger, more powerful speaker can fill an entire concert hall!
There are four different levels of pyramids you can build for your beacon.
Each level requires a specific base size made of blocks like iron, gold, diamond, emerald, or netherite.
These materials are like the fuel for your beacon’s power.
Let’s break down how each pyramid level affects the range and what kind of power you get:
| Pyramid Level | Base Size (Blocks) | Range (Blocks) | Effects Granted |
|---|---|---|---|
| Level 1 | 3×3 | 20 | Primary (Speed, Haste, Resistance, Jump Boost, Strength) |
| Level 2 | 5×5 | 30 | Primary (Speed, Haste, Resistance, Jump Boost, Strength) |
| Level 3 | 7×7 | 40 | Primary (Speed, Haste, Resistance, Jump Boost, Strength) |
| Level 4 | 9×9 | 50 | Primary + Secondary (Regeneration or strong Primary) |
As you can see, a fully powered Level 4 beacon provides a massive 50-block range in every direction. That’s a huge area to benefit from its effects!
The range is measured from the beacon block itself, outwards.
So, if your beacon is at coordinates (0, 64, 0) and has a 50-block range, you’ll feel the effects up to (50, 64, 0), (-50, 64, 0), and so on.
This spherical range means you can move quite a bit and still be under your beacon’s influence.
It’s important to plan your beacon’s placement carefully, especially in large bases or mining areas, to maximize its utility.
Considering the resources needed for a full pyramid, using the right Minecraft tools to gather them efficiently is key.
Knowing the range helps you decide where to place your beacon so all your crucial areas- like farms or crafting stations- are covered.
What’s the largest area you’ve managed to cover with a single beacon, and what effects did you find most useful for that space?
Your Visual Guide: The Ultimate Beacon Range & Effects Cheat Sheet
So, you’ve built your awesome beacon, but how far does its magic reach? And what cool powers can it give you?
This “cheat sheet” is here to make sense of it all. It shows you exactly what you get for each level of your beacon pyramid.
Understanding Beacon Levels
The power of your beacon depends on how big the pyramid underneath it is. The bigger the pyramid, the stronger and farther-reaching its effects become.
You build these pyramids from valuable blocks like Iron, Gold, Diamond, or Emerald. Each block type offers the same boost, so pick what you have most of!
Remember that you’ll need a fair amount of these Minecraft tools and resources to build the larger pyramids.
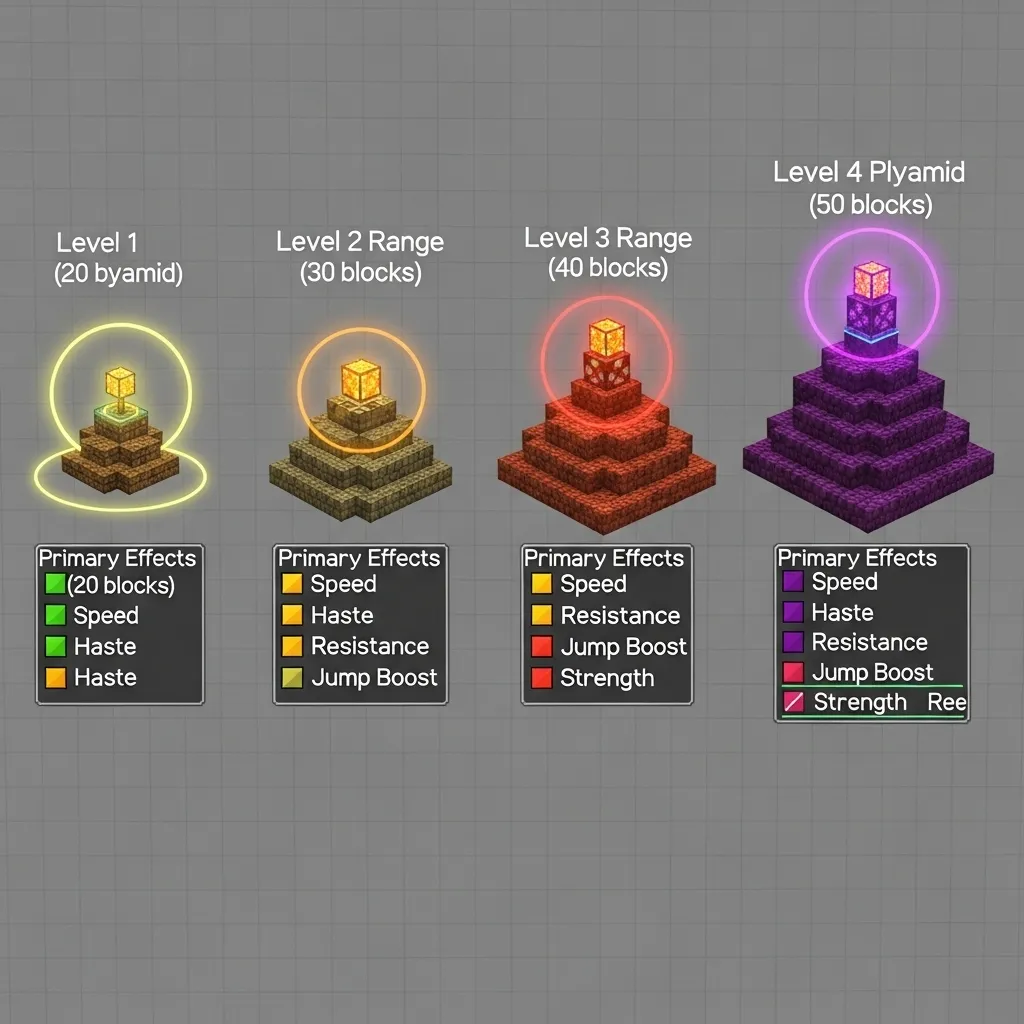
The Ultimate Beacon Range & Effects Table
This table breaks down everything you need to know about your beacon’s power.
It’s your go-to guide for planning your base and getting the buffs you want.
| Pyramid Level | Base Size (Blocks) | Range (Blocks) | Primary Effects Available | Secondary Effect Available |
|---|---|---|---|---|
| Level 1 | 3×3 | 20 | Speed, Haste | None |
| Level 2 | 5×5 | 30 | Speed, Haste, Resistance, Jump Boost | None |
| Level 3 | 7×7 | 40 | Speed, Haste, Resistance, Jump Boost, Strength | None |
| Level 4 | 9×9 | 50 | Speed, Haste, Resistance, Jump Boost, Strength | Regeneration OR Primary Effect Level II |
Primary vs. Secondary Effects Explained
When you activate a beacon, you choose a primary effect. This is the main buff that will spread out to players within its range.
Once you build a full Level 4 pyramid, you unlock something really special.
You can either add Regeneration as a secondary effect, or you can boost your chosen primary effect to Level II, making it even stronger!
What’s your favorite beacon effect to use in Minecraft, and why?
Optimal Beacon Placement for Maximum Coverage
Alright, so you’ve built your beacon and seen it shoot a light beam into the sky.
Cool! But how do you make sure its awesome effects reach where you need them most?
It all comes down to smart placement. The beacon’s power, including its range, depends entirely on the size of the pyramid you build underneath it.
There are four different levels of pyramids you can construct. Each level increases the area where your beacon’s effects, like Haste or Speed, will be active.
A Level 1 pyramid is the smallest. It’s a 3×3 base of iron, gold, diamond, or emerald blocks. This gives you a range of 20 blocks in every direction.
Level 2 expands to a 5×5 base on the bottom, with a 3×3 layer on top. This boosts your range to a decent 30 blocks.
Level 3 uses a 7×7 base, then 5×5, then 3×3. Now you’re getting serious with a 40-block range for your effects.
Finally, the maxed-out Level 4 pyramid is a huge 9×9 base, followed by 7×7, 5×5, and 3×3 layers. This grants a massive 50-block radius!
| Pyramid Level | Base Size | Effect Range (Blocks) |
|---|---|---|
| 1 | 3×3 | 20 |
| 2 | 5×5 | 30 |
| 3 | 7×7 | 40 |
| 4 | 9×9 | 50 |
So, where should you put this powerful block?
For general base coverage, placing your beacon right in the center of your main activity hub is often the best plan.
If your base is 100×100 blocks, a single Level 4 beacon in the middle won’t cover everything.
A 50-block radius means it will cover a 100×100 square around it. So it can cover a good chunk of your space!
When you’re mining for long periods, placing a beacon with Haste near your strip-mining area is super effective.
It speeds up breaking blocks like crazy, making your mining trips much faster.
For large farms, consider a beacon with Speed or Jump Boost. This makes moving around and harvesting much quicker and less tedious.
For truly enormous bases or multiple distinct work areas, you might need to build more than one beacon. Think about where your players spend the most time.
It’s a bit like planning an efficient road system for a city. You want to make sure key areas are connected and easily accessible.
Similarly, you can plan how to build an efficient Minecraft Nether Hub.
This helps speed up travel and connect distant points in your world.
Remember, the beacon’s effects also extend upwards and downwards.
This means you can place it above or below ground and still get benefits, as long as you’re within the effect range.
If you have multiple levels in your base, a centrally located beacon on an upper floor might cover more ground-level and underground areas simultaneously.
Optimal placement is all about balancing the pyramid’s resource cost with the area you need to cover. A smaller beacon might be enough for a starter base.
How do you usually decide where to place your beacons to get the most out of them in your Minecraft world?