Think of your crosshair as a boxing glove. It determines where your punch lands.
In Minecraft, aiming correctly maximizes your reach, letting you hit enemies before they touch you.
It isn’t magic; it is physics. Let’s master the aim.
Key Takeaways
- Aim at the neck or upper chest to maximize vertical knockback.
- Lead your shots horizontally to account for enemy strafing and speed.
- Adjust your aim distance based on your ping to counter server lag.
- Maintain a 3-block distance to utilize the maximum reach sweet spot.
Master Minecraft PvP Crosshair Placement for Max Reach (The Definitive Guide)
Think about PvP like a boxing match. Your crosshair isn’t just a dot; it’s where your punch lands.
In Minecraft, maximizing your “reach” means landing hits from the longest possible distance before the enemy can touch you.
This isn’t about cheating. It’s about perfect positioning and timing, which your crosshair dictates.
Mastering this simple technique can drastically improve your combo potential and survival rate.
Understanding Minecraft Reach Mechanics
Minecraft’s combat system has fixed reach limits, usually around 3 blocks for standard melee attacks.
But true reach isn’t just distance. It’s about hitting the largest part of the enemy’s hitbox quickly.
A hitbox is the invisible box around the player model. It’s usually 0.6 blocks wide and 1.8 blocks high.
Pro players know that where you aim on that box changes everything about the fight.
The High-Aim Advantage: Head vs. Body
Many new players aim straight at the chest because it feels like the easiest target.
However, aiming slightly higher-at the neck or the upper chest-gives you a massive advantage.
Why? When you land a hit, the enemy receives knockback.
Aiming high maximizes upward knockback, preventing the opponent from running away easily.
It also gives you a fractionally larger window for hit registration, especially if they are jumping or falling.
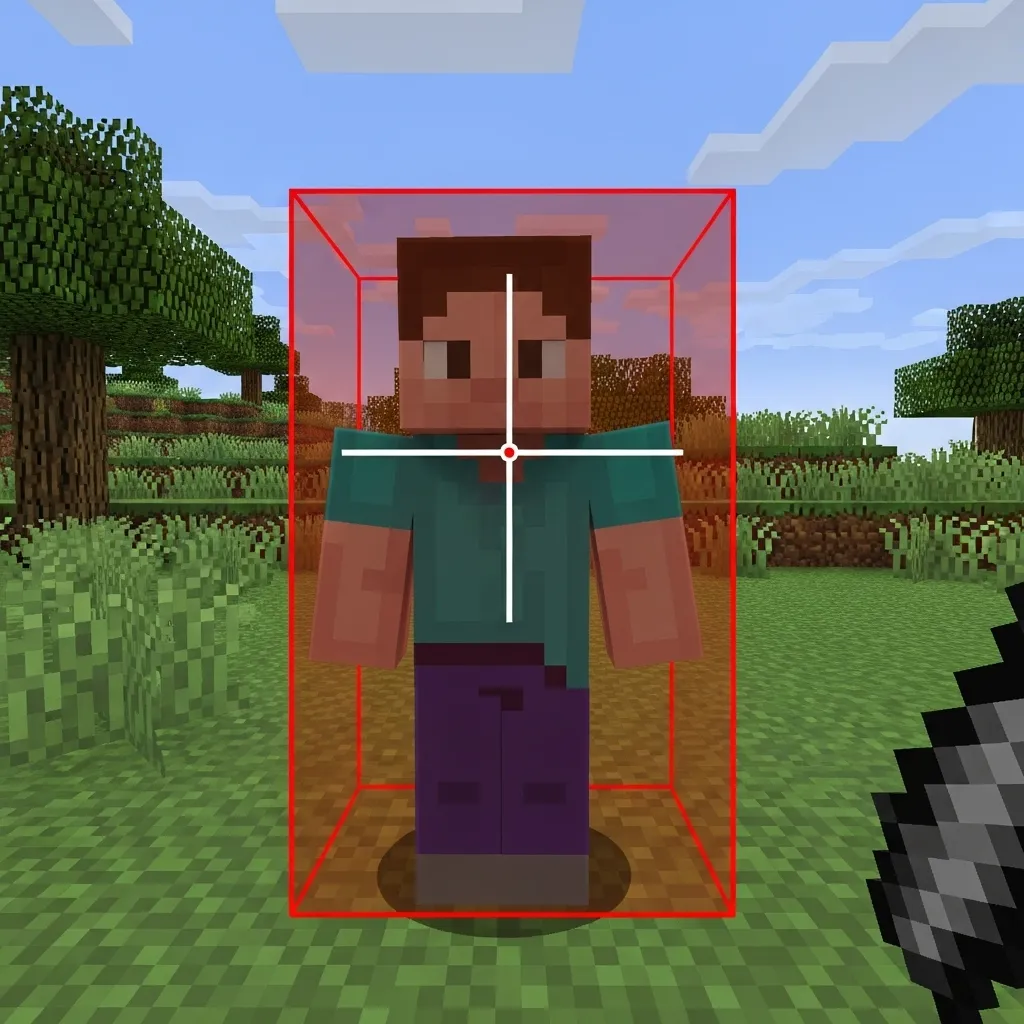
The “Two Pixel” Vertical Rule
The core technique for maximum reach involves micro-adjusting your vertical aim.
Instead of aiming at the center of the screen, try placing your crosshair two pixels above the center of the enemy’s chest.
This hits the sweet spot-the neck and upper shoulders-which controls knockback.
It helps keep them in the air slightly longer, making it easier to follow up with a combo.
This is crucial when mastering more complex movement like S-Tapping or W-Tapping.
If you want to refine those movement skills, learning to master hit selecting and S-Tapping is the next step.
Horizontal Leading for Maximum Connection
If your opponent is running directly at you or away from you, horizontal placement is easy: aim straight.
But what if they are strafing (moving side-to-side)? You have to lead your shot.
Leading means aiming slightly ahead of where they are currently standing.
The amount you lead depends heavily on your latency (ping).
Higher ping requires you to lead shots further, as there’s a delay before the server registers your hit.
The Latency Factor: When Ping Eats Reach
Your ping is the time it takes for your computer to talk to the server.
This delay directly shrinks your effective reach, forcing you to rely more on prediction.
If your ping is too high, the server might reject hits that look perfect on your screen.
The vast majority of top-tier PvP players aim for less than 75ms latency for critical fights.
A bar chart showing preferred competitive latency for PvP: Below 50ms (65%), 50-100ms (25%), 100-150ms (7%), and 150ms+ (3%).
If you struggle with latency, adjusting your crosshair placement slightly further ahead (leading the shot) is critical.
However, excessive ping requires different tactics entirely, like focusing on items.
Learning advanced respawn anchor tactics might be smarter than relying on pure melee reach.
Summary: Three Steps to Perfect Reach Aim
Use this checklist in every 1v1 to train your muscle memory:
- Identify the Neck: Aim 2-3 pixels above the center mass to maximize vertical knockback.
- Predict Movement: Lead your crosshair horizontally if the opponent is strafing, especially with higher ping.
- Maintain Distance: Keep your aim steady while maintaining 3-block spacing to leverage maximum reach before initiating a combo.
Perfect crosshair placement is more about discipline than talent.
It means consistently aiming for that sweet spot, regardless of the chaos around you.
If you can lock onto the neck and maintain that vertical discipline, your combo game will soar.
What is the single hardest part about keeping your crosshair locked on the target during a fast-paced fight?
The 3.2 Block Reach Sweet Spot: Targeting Specific Hitbox Pixels
In Minecraft PvP, 3.2 blocks is the magic number for melee combat reach.
This is the absolute maximum distance you can hit your enemy without server lag or modifications.
Hitting someone right at this limit is often called finding the “reach sweet spot.”
Your goal isn’t just to hit them once; it’s to sustain that 3.2-block distance as you move, maximizing the time they spend in your attack zone.
Finding the Target Pixels
This is where precision crosshair placement becomes crucial.
Minecraft hitboxes are rigid: 1.8 blocks high and only 0.6 blocks wide.
When you are at max reach (3.2 blocks), the target’s hitbox looks tiny and far away.
Even a slight aim drift means you miss the hit and lose the initial combo opportunity.
You need to train yourself to aim for the largest, most stable part of that small, moving target.
Pro players learn to target specific pixel areas based on what they want to achieve with knockback.
Think of your crosshair as a high-powered laser sight that must stay glued to one spot.
This level of consistency is why having optimized mouse DPI and polling rate settings is critical for tiny, precise adjustments.
Crosshair Placement by Engagement Distance
The ideal crosshair position changes drastically depending on how close or far you are from your opponent.
When you are right at max reach, you prioritize hitting the center mass for consistency.
When you are up close, you might aim lower to manipulate vertical movement.
| Distance (Blocks) | Recommended Target Area | Reason |
|---|---|---|
| 3.0 – 3.2 (Max Range) | Upper Chest/Neck | Largest, most stable target area for consistent registration at maximum distance. |
| 2.0 – 3.0 (Mid-Range Combo) | Center Mass (Torso) | Allows slight vertical correction if the enemy jumps or shifts suddenly. |
| < 2.0 (Close Range/Strafe) | Legs/Feet | Focuses knockback downward, making it harder for the enemy to escape or get high vertical hits. |
If you aim lower, especially at the legs, you change the angle of the knockback you apply.
This is essential when you want to keep the enemy grounded and deny them the ability to jump or use momentum.
Learning advanced vertical knockback and spacing techniques helps you understand why this low aiming matters so much.
Mastering this pixel-level aiming is a high-level skill that separates good players from truly dominant ones.
What specific crosshair settings do you use that help you zero in on those distant target pixels?
Optimal Crosshair Placement for Moving Targets
Hitting a stationary player is easy, but PvP opponents rarely stand still.
When someone is sprinting, jumping, or strafing, you cannot just aim directly at their body.
You need to “lead” your target. Think of it like trying to catch a moving ball mid-air.
Leading means placing your crosshair where the player is going to be in the next few milliseconds, not where they are right now.
This is crucial because Minecraft combat is heavily affected by network delay, or what we call “ping.”
The Delay Difference: Why Prediction is Reach
If you aim perfectly at the player’s current spot, your attack packet will arrive too late.
By the time the server processes your hit, the player’s movement has already carried them out of your reach zone.
To maximize your 3-block reach, you must anticipate their future location.
Calculating the Lead: The Half-Block Rule
For standard sprinting opponents in a classic PvP environment (like 1.8), a common technique is the “half-block lead.”
If your enemy is running straight to the left, you place your crosshair about 0.5 blocks ahead of the visual edge of their hitbox.
This placement perfectly accounts for typical server latency and maximizes your combo potential.
The better you get at predicting common opponent movement-like S-tapping or W-tapping patterns-the smaller your required lead becomes.
How far you need to lead depends entirely on how quickly the server registers the hit.
If you have high ping, you need to lead your opponent much further ahead to compensate for the greater delay.
A bar chart illustrating how higher latency (ping) requires significantly more predictive lead time in milliseconds to secure a hit.
Crosshair Placement During Strafe Wars
Strafing is when an opponent rapidly moves side-to-side to break your aim.
Instead of chasing their hitbox, keep your crosshair fixed on the imaginary pivot point they are running back towards.
If they run Left, stop, and run Right, place your crosshair just to the right side of their body while they are currently moving left.
You are aiming for the instant they change direction, before they reach the point of maximum speed in the new direction.
This technique is how pros maintain deep combos against highly mobile targets.
Advanced Leading Tips
Use this guide to fine-tune your crosshair placement when dealing with different enemy movements.
- Standard Sprint: Lead by 0.3 to 0.5 blocks ahead of their movement path.
- Diagonal Strafe: Aim slightly past the forward corner of their shoulder or head.
- Knockback Recovery: Wait for them to stop drifting and aim for their upcoming forward movement.
- Jumping/Falling: Aim low, keeping the crosshair near their feet or base block to catch them the moment they land.
- High Ping Opponent: You must lead them more significantly-sometimes a full block ahead-as they are visually behind their true position.
Mastering this predictive crosshair placement is what separates the average player from a champion.
It turns your aiming into a constant, predictive mind game against the enemy and the server’s delay.
If competitive servers continue to improve latency, will the need for predictive leading eventually disappear?
Client vs. Server: Understanding Hit Registration Delay at Maximum Range
We talk a lot about maximizing reach and perfecting crosshair placement.
But there is a hidden enemy in PvP: time, also known as latency or lag.
In Minecraft, you have two realities: your client (what you see) and the server (what is actually happening).
When you click your mouse, your client sends a packet to the server saying, “I just hit them!”
The server has to receive that packet, process it, and confirm the hit. This takes time.
This delay is called lag or ping. It drastically affects hit registration at max range.
The Physics of the Missed Max-Range Hit
If you are standing 3 blocks away, the hit window is large enough that the delay usually doesn’t matter much.
However, when you push your reach to the absolute limit-say, 3.0 or 3.2 blocks-this delay becomes critical.
The moment you click, the target might still be perfectly centered in your crosshair.
But by the time the server receives your “hit” packet, the target has moved 0.05 blocks and is now out of range.
Result? A missed hit, even though your aim looked perfect on your screen.
This concept is the biggest hurdle for players who rely on “ghost hits” or high ping strategies.
This is why understanding client vs. server delay is essential for high-level crosshair placement.
You must learn to “lead” the target slightly, especially if you have high ping.
The worse your connection is, the further ahead you need to place your crosshair.
Essentially, you are aiming where the player will be when the server registers your attack, not where they are right now.
If you want to reduce the visible delay you experience, optimizing your network connection is key.
You can read more about reducing lag by using specific mods in our guide on Minecraft 1.21 PvP: Best Fabric Mods for Low Latency.
Visualizing Ping and Delay
The server adds a minimum amount of processing time to every action, usually around 20 milliseconds (ms).
If your ping is 100ms, the total round trip delay for a hit confirmation is closer to 200ms or more.
A bar chart illustrating total hit registration delay (in milliseconds) based on player ping. Note that server processing adds 20ms to the total visible delay. Low Ping (20ms) results in 40ms delay, Medium Ping (80ms) results in 160ms delay, and High Ping (150ms) results in 300ms delay.
Adjusting Crosshair for Lag Compensation
Your adjustment needs to be instant and subtle. It depends heavily on the speed and direction of your opponent.
- Low Ping (0-50ms): Aim almost directly at the player. A slight lead on fast strafes is enough to secure the hit.
- Medium Ping (50-100ms): Aim for the trailing shoulder or slightly behind the center mass when they are running away.
- High Ping (100ms+): You must lead the target aggressively, aiming for where they will be 1/10th of a second in the future.
- Stationary Target: Aim directly, but click slightly faster than usual to account for the processing time.
If you constantly find yourself whiffing when you are sure you hit, latency is probably the culprit.
The highest level of PvP mastery involves integrating crosshair aim with ping awareness.
You need to know how to use this knowledge in different situations, like when you are attempting the quick axe swap shield disable trick at range.
It’s not just about precision; it’s about predicting the future based on the server’s delay.
Considering how variable server latency is, how much time do you spend practicing hits against different levels of lag?
Optimizing PvP Settings for Reach Aim
Getting better reach hits isn’t just about your clicking hand.
It starts with how you set up your game. We need settings that give you precision, not just raw speed.
The two core elements affecting precise crosshair placement are your sensitivity and your Field of View (FOV).
Finding Your Perfect Sensitivity (DPI/In-Game)
When you focus on hitting at the maximum range of 3.0 blocks, precision is your best friend.
Super-high sensitivity might feel fast, but it makes tiny, far-off micro-adjustments nearly impossible.
If you twitch your mouse even slightly, your crosshair flies right past your target’s hitbox.
Most elite players use a low-to-medium Effective DPI (eDPI) for consistent aim.
eDPI is simply your mouse DPI multiplied by your in-game sensitivity percentage (converted to a decimal).
A great starting point for maximum accuracy is an eDPI between 4,000 and 8,000.
If you haven’t yet, take the time to find the best Minecraft PvP sensitivity for perfect aim and secure that reach.
A bar chart showing the common eDPI ranges: Low (20%), Medium (65%), and High (15%). Medium range is most popular for competitive precision.
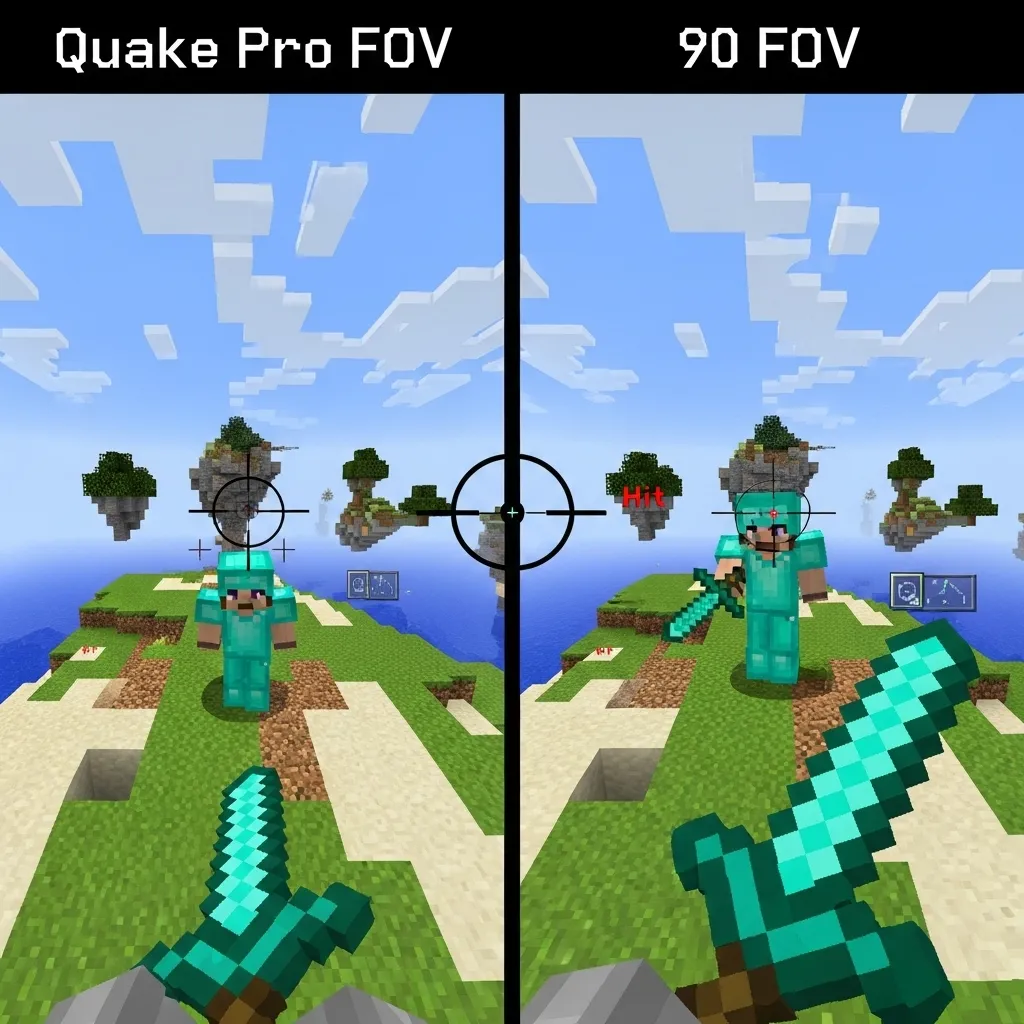
The FOV Dilemma
Your Field of View setting drastically changes how far away enemies appear.
High FOV (like Quake Pro) makes everything look smaller and faster, often increasing your perceived reach.
While this is great for spotting players quickly, it makes precision aiming at long range much harder.
A lower FOV, typically set around 80-90, makes the target appear bigger on your screen.
This setting helps immensely with crosshair placement, especially when attempting to land consistent reach hits.
Experiment to find the FOV that makes the three-block hit range feel the most manageable for your eyes.
Essential Drills for Crosshair Reach Training
Crosshair placement focused on reach is fundamentally about movement prediction, not just reaction.
You need to hit the opponent where they are going to be, right before they exit your narrow hit window.
This requires building strong muscle memory, which is done through consistent, targeted drills.
Three Drills to Master Reach Aim
Use these drills on practice servers or with a sparring partner to lock down your long-range hits.
- The Strafing J-Hit Drill
- The Prediction Ghost Aim Drill
- Reach Zoning and W-Tapping Practice
1. The Strafing J-Hit Drill
This drill teaches you how to maintain aim lock while performing complex footwork.
Go to a practice arena with a bot or a friend who keeps moving predictably.
Start strafing aggressively left and right (A and D keys) while closing the distance.
Your primary goal is to keep your crosshair locked exactly on their center mass while you are constantly moving.
Next, introduce quick jumps (J-Hits) at the peak of your strafe movement.
You must ensure the crosshair lands the hit perfectly at the furthest possible point.
If your aim feels shaky or jerky during the strafe, try lowering your mouse sensitivity slightly.
2. The Prediction Ghost Aim Drill
This is a challenging mental exercise focused purely on anticipating enemy movement.
During a normal duel, try to aim slightly ahead of your opponent-where you know they will be in the very next game tick.
Do this even if you miss the hit intentionally at first. Focus on their pathing.
This trains your brain to anticipate the maximum reach point of the enemy’s trajectory.
Truly great reach hits depend on your ability to read the opponent, so improving your ability to predict enemy movement in 1v1s is key here.
3. Reach Zoning and W-Tapping Practice
Join any standard duel or boxing arena on a PvP server.
Focus only on using W-tapping or S-tapping to reset your sprint.
The goal is to maximize the distance of your first hit in every engagement.
Every time you engage, actively try to start the combo with a reach hit at 3.0 blocks.
This constant zoning practice makes landing those “long” initial clicks feel natural and automatic.
By optimizing your settings and dedicating practice to prediction, you shift your game from reactive clicking to proactive, calculated reach hits.
What is one specific training drill you plan to incorporate into your next PvP session to improve your 3-block reach percentage?