Tired of manually brewing potions while your base gets raided? It’s time to upgrade. The Crafter block changes everything for Factions players.
Discover how to build a compact, automated brewing machine that keeps your team stocked with instant health and strength buffs 24/7.
Key Takeaways
- The Crafter block replaces bulky dispenser arrays with a compact, lag-friendly design.
- Automate crucial PvP potions like Strength II and Healing II to stay raid-ready.
- Use hopper timers to sync the 20-second brewing cycle with ingredient drops.
- Prioritize farming Ghast Tears and Blaze Rods for constant, high-volume production.
- Modular Crafter setups let you brew multiple recipes simultaneously in small spaces.
Crafter Efficiency vs. Dispensers: The Factions Advantage
The Old Guard: Why Dispensers Failed Factions
For years, if you wanted bulk potions, you had to use complicated dispenser setups.
These systems were a mess of Redstone dust, droppers, and multiple brewing stands.
They worked to a degree, but they were never truly efficient or fast enough for a serious Factions base.
Imagine being raided. You need hundreds of Instant Health II potions right now.
Waiting for a dispenser array to slowly feed materials felt like ages during critical moments.
The Crafter block changes this entire dynamic. It’s like replacing a rickety old steam engine with a jet turbine.
Speed vs. Bulk: Time is Your Faction’s Best Resource
In Factions, resource efficiency isn’t just about saving gold. It’s truly about saving time.
When you are gearing up for a major raid or defense, every second spent brewing manually is time wasted.
A standard brewing stand takes about 20 seconds (400 game ticks) just to complete one brewing step.
A complex dispenser system still has to wait for that underlying brewing stand timer to finish.
The Crafter, however, handles the ingredient combination instantly-as soon as all items are in place.
This massive reduction in required redstone logic and time makes automated potion restocking finally viable for high-stakes PvP.
A bar chart comparing the time in seconds required to fully brew a 3-bottle batch of basic potions (2 steps): Manual Brewing Stand (40 seconds), 3-Dispenser Array (40 seconds), and an Automated Crafter System (5 seconds, limited by input/output speed).
Why Crafters Are Crucial for Faction Defense
The Factions world demands that valuable resources be compact and secure, especially in your base core.
Dispenser setups were massive. They needed long, vulnerable lines of redstone and large clock circuits.
This bulk made them easy targets during raiding and base infiltration attempts.
The Crafter block is a single, highly compact unit. This drastically shrinks your entire brewing footprint.
You can hide your automated production line in a much smaller, better-protected area underground.
In a tight PvP environment, this compactness protects vital brewing ingredients, such as expensive Blaze Powder or Dragon’s Breath.
It also simplifies maintenance. Less redstone means less chance of failure and less impact on server lag.
Component Count and Simplicity
Think about the sheer number of physical components you save by switching to the Crafter for automation.
The simplicity reduces failure points-a massive benefit when your faction relies on a constant supply of buffs.
Here is a basic look at the component difference for creating one full automated brewing cycle:
- Dispenser Array (Old Method): Requires 3 Brewing Stands, 6-9 Dispensers/Droppers, 2 Redstone Clocks (or complex comparators), 20+ Redstone Dust, and multiple input hoppers.
- Crafter System (New Method): Requires 1 Brewing Stand (for the final bottle output only), 1 Crafter block, 2-3 Hoppers, 1 Comparator, and minimal Redstone dust/torch for activation.
The difference in required blocks is staggering, which frees up materials for base construction and defense.
This level of clean, fast automation is the key to managing potion stock for every high-stakes encounter.
Will the new Crafter efficiency shift the entire Factions meta, making powerful potions easier to mass-produce and PvP combat even more fast-paced?
Crafter Item Placement Logic vs. Traditional Brewers
Before the Crafter block arrived, automated brewing was a major headache.
You probably remember the old way: massive Redstone clocks, droppers, and dispensers carefully pointed at a brewing stand.
It was a huge build, and if one thing failed, your whole potion stock stopped.
The Crafter changes everything, offering a cleaner, faster, and more reliable process, which is essential when preparing for a Factions raid or defense.
Placement Logic: Precision vs. Inventory Management
The core difference lies in how items get into the brewing stand.
The Dispenser Method: Aim and Timing
A dispenser is essentially an automated right-click.
When powered, it fires an item. To brew, it had to fire the ingredient directly into the brewing stand’s hitbox.
If you wanted to add two ingredients, you needed two perfectly aligned dispensers and complex Redstone timing.
This was often laggy and incredibly sensitive to placement on Factions servers.
The Crafter Method: Direct Slot Control
The Crafter block eliminates the need for physical aiming entirely.
It works by taking items from its own nine inventory slots and placing them into the connected block.
By connecting a Hopper to the input slot of the brewing stand and placing the Crafter directly adjacent, it pushes the ingredients in order.
It acts like a smart funnel, drastically simplifying the build footprint.
Speed and Reliability in Factions
When you are gearing up for PvP, speed matters. You need hundreds of splash potions quickly.
While the brewing time (20 seconds per stage) remains constant, the Crafter excels in throughput and setup reliability.
Throughput Comparison
A dispenser setup often required delay loops to ensure the powder was added, then the primary ingredient, and then the secondary.
The Crafter uses Redstone pulses to move items instantly, one item per pulse.
This makes restocking ingredients far smoother and more immediate than the old timing circuits.
If your Factions server struggles with lag, those complex dispenser circuits are the first things to break.
The Crafter uses simpler, pulse-based logic that is much less demanding on server performance.
A bar chart comparing the estimated number of redstone components needed: Dispenser System (35 components) vs. Crafter System (12 components).
The Benefit of Simplicity
The ultimate win for Factions players is simplicity.
When you are building a hidden base or a complex raid defense setup, reducing moving parts is crucial.
The Crafter allows you to tuck an entire brewing mechanism into a small corner, saving precious base space.
Plus, if the circuit is simpler, it is easier to troubleshoot when things inevitably go wrong on a busy server.
Here is a quick breakdown of how they stack up:
| Feature | Crafter-Based System | Dispenser-Based System |
|---|---|---|
| Redstone Complexity | Low-to-Medium (simple clock needed) | High (requires precision timing) |
| Build Size | Compact (2×2 footprint) | Large (requires multiple dispensers/hoppers) |
| Lag Sensitivity | Low | High (timing easily desyncs) |
| Placement Logic | Inventory-based (direct link) | Physics-based (aiming) |
If you are also worried about reducing lag to boost your combat performance, check out our guide on Top Low Lag PvP Shaders for FPS benefits outside of your base.
The Crafter is the clear champion for modern Factions brewing.
It trades complex physical placement for streamlined digital inventory control.
Considering the shift toward more efficient automation, do you think future block updates should focus on simplifying other complex Redstone tasks?
Focus on Compact Designs for Limited Base Space
Why Compact Brewing is Non-Negotiable
In a competitive Factions setting, space is the ultimate luxury.
You need thick walls, strong defenses, and places to store all your gear.
A massive, rambling brewing machine is just a liability. It uses up resources and makes your base harder to secure.
The Crafter block solves this massive problem by letting you build systems that take up very little floor space.
This allows you to dedicate more real estate to securing the core of your base, or perhaps creating extra PvP practice rooms.
Mastering the Vertical Stack
When we talk about compact designs, we are primarily talking about building vertically.
Old brewing systems required a lot of horizontal movement for droppers and hoppers to line up the ingredients.
The Crafter eliminates this need because it sits directly underneath the Brewing Stand.
It acts as both the ingredient container and the Redstone trigger, all in one small block.
This means your brewing station can be as narrow as 1×1, extending only upwards.
Anatomy of a 1×1 Compact Brewer
A true space-saving design usually fits perfectly into a one-block column. It maximizes efficiency for minimal volume.
When you are designing your base, remember that defense comes first. Every block dedicated to utility is one less block for protecting your valuables.
This compact design gives you more space to reinforce your Factions base with maximum protection.
| Component | Purpose in Vertical Design | Key Space Efficiency |
|---|---|---|
| Brewing Stand | The core unit that brews the potion. | Must be placed directly above the Crafter. |
| The Crafter | Automatically inserts up to nine ingredients. | Replaces complex dropper arrays and Redstone timing. |
| Fuel Hopper (Top) | Feeds Blaze Powder into the stand. | Allows vertical access for continuous fuel. |
| Output Hopper (Bottom) | Collects the finished potions. | Usually hidden one layer below floor level. |
Visualizing the Space Savings
To truly understand the advantage, look at the difference in block volume between the old methods and the new Crafter method.
By relying on the Crafter, you drastically cut down the amount of exposed Redstone and bulk.
A bar chart comparing the volume of blocks needed for a Traditional Dropper System (30 blocks) versus a Compact Crafter System (4 blocks).
A compact system typically requires about 86% fewer blocks than a standard, multi-stage dropper setup.
This efficiency lets you fit multiple specialized brewing lines (e.g., Strength, Speed, Regeneration) into the space previously used by one.
Designing for Security and Redundancy
In Factions, a compact design also means improved security.
A small machine is easier to hide, easier to defend, and less likely to be completely destroyed by a single blast.
Hiding the Logic
When building your vertical column, keep all the Redstone logic completely contained within the walls.
Since the Crafter uses simple pulse activation, your Redstone can often be reduced to just a button or lever triggering a single repeater to the block.
If you use an item filter (like a simple comparator lock) to control which ingredients enter the Crafter, hide that circuit deep inside the wall.
The less visible the infrastructure, the better protected it is from griefing and unwanted detection.
When maximizing your defense against opponents, how much space do you typically dedicate to utility versus pure structural reinforcement?
Essential Factions PvP Potions and Optimized Ingredient Sourcing
The Unbeatable Potion Loadout for Factions
In Factions PvP, preparation is everything. Your success often hinges on how quickly you can chug the right buff.
The Crafter block helps you scale this preparation, turning a tedious task into reliable automation.
But first, we need to know exactly which potions are non-negotiable for serious raids and defenses.
These are your essential elixirs:
- Strength II (8:00): The king of offense. It’s what you chug right before the engagement starts.
- Speed II (8:00): Crucial for chasing down opponents or making a fast escape from a bad situation.
- Regeneration I (45 seconds): While short, it helps counter lingering damage like poison or instant damage splash potions.
- Healing II: Your instant “oh no” button. Splash these quickly to survive a massive blow.
- Fire Resistance (8:00): Absolutely vital for fighting near lava traps or when using Respawn Anchor tactics.
Pinpointing Your Potion Ingredient Bottlenecks
The Crafter is amazing, but it can only craft what you feed it. In Factions, bottleneck resources determine your production limit.
The shared base ingredient for almost all viable PvP potions is Nether Wart. That’s usually easy to farm in bulk.
The real challenge lies in the secondary and tertiary ingredients that add power, duration, or effect.
These are the ingredients you need to hyper-optimize sourcing for your automated system:
- Blaze Powder (for Blaze Rods): Required for Strength II. A dedicated blaze farm is essential for large-scale production.
- Glowstone Dust: Required to upgrade potions from I to II (Speed II, Strength II, Healing II). This resource is consumed rapidly.
- Ghast Tears: Needed for Regeneration potions. These are notoriously tricky to farm efficiently due to the creature’s mechanics.
Optimizing Your Ingredient Flow for Automation
Automating potions with the Crafter is all about constant flow. If one ingredient dries up, the entire brewing line stops immediately.
To prevent this, you must prioritize building robust, automated farms for your most valuable, hard-to-get items.
Ghast Tears are often the most time-consuming item to gather, sometimes even compared to farming items like Wind Charges.
Building a highly efficient Ghast farm in the Nether can drastically reduce the labor hours needed by your faction members.
Similarly, ensure you have an industrial-scale Glowstone Dust source, either through massive mining or a dedicated trading system.
The speed at which you can restock these chests is what determines your true, sustainable faction PvP strength.
A bar chart comparing the estimated minutes required to source ingredients for 64 Strength II potions: Blaze Rods (15 min), Glowstone Dust (10 min), and Ghast Tears (60 min).
As the chart shows, Ghast Tears sourced manually are a massive time sink-four times longer than Blaze Rods.
This is solid evidence that the bulk of your Crafter automation efforts should focus on solving the Regeneration potion ingredient crisis.
Balancing Production with Demand
Keep a close eye on your faction’s consumption rate across different types of fighting.
If your team is doing deep raids, they will burn through Fire Resistance and Speed very quickly.
If you are mostly fighting close 1v1s at the base, the demand shifts heavily toward Healing II splashes.
Using the Crafter setup allows you to quickly change the recipe template based on these dynamic needs.
Instead of manually preparing for a weekend raid, you can simply flip a lever and let the system stock the exact necessary potions.
Considering the high demand for Healing and Strength, how often do you think a fully automated system needs refilling?
This should be weighed versus the total time saved by not brewing everything manually.
Specific Potion Recipes Crucial for Factions Combat
The Core Four: Why These Potions Rule Factions Combat
When you are gearing up for a big Factions raid or a massive PvP battle, your potion supply is just as important as your armor and sword.
These four specific potions are the absolute MVPs.
They offer maximum impact with minimal brewing time, especially when you use the Crafter block to automate the process.
Having a steady supply means you can constantly replace resources lost in combat, keeping your faction ready for the next fight.
Strength II: Dealing Maximum Damage
Strength II is your offensive powerhouse. This potion dramatically increases the melee damage you deal, letting you end fights much quicker.
It acts like a huge force multiplier. When time is critical, and you are trying to punch through enemy lines, this is the potion you need.
The standard process involves adding Nether Wart, then Blaze Powder, followed by Glowstone Dust to reach the potent Level II effect.
Using automated crafting systems for Strength II is crucial for players who want to master custom Vow SMP PvP and dominate the battlefield.
Speed II: Controlling the Map
In Factions, movement is life. Speed II is essential for tactical maneuvering, especially when raiding bases with complex walls or defenses.
This potion allows you to quickly chase down enemies attempting to pearl away or make a sudden, vital retreat to safety.
You brew Speed II by adding Sugar to an Awkward Potion, and then upgrading it with Glowstone Dust to double your movement speed.
Many professional PvP players prioritize mobility, knowing that outrunning an opponent is often better than trying to out-damage them.
Invisibility: The Element of Surprise
Invisibility is the sneaky option.
While it won’t help you win a direct sword fight, it helps you start one on your own terms, or avoid unnecessary conflict entirely.
It’s perfect for scouting enemy war zones or slipping into a perimeter to place TNT during a raid.
The Crafter sequence for this one is a little trickier: Nether Wart, then a Golden Carrot for Night Vision, and finally a Fermented Spider Eye to reverse the effect into Invisibility.
Healing II: Instant Lifeline
Healing II is the instant save. Whether thrown as a splash potion or consumed, it restores a large chunk of health immediately.
These potions are often carried in stacks and are spammed during intense, close-quarters PvP engagements to ensure survival.
For automated crafting, you start with the basic Potion of Healing (Glistering Melon Slice) and upgrade it with Glowstone Dust.
If you are making these for combat, the final Crafter step should always be adding Gunpowder to turn them into throwable splash potions.
A pie chart showing typical Factions combat potion distribution: Strength II (45%), Healing II (30%), Speed II (20%), and Invisibility (5%).
Mastering Automated Recipe Sequences
The beauty of the Crafter block is its ability to follow a sequential recipe perfectly, eliminating manual mistakes and saving you precious time.
To set up these key combat potions, you must ensure the redstone signal triggers the ingredients in the correct order: Base -> Effect -> Upgrade/Modifier.
The following table outlines the minimum required ingredients, assuming you start with an empty glass bottle and Nether Wart has already been added in the first Crafter cycle.
| Potion Goal | Crafter 1 (Effect) | Crafter 2 (Level II) | Crafter 3 (Splash Conversion) |
|---|---|---|---|
| Strength II | Blaze Powder | Glowstone Dust | Gunpowder (Optional) |
| Speed II | Sugar | Glowstone Dust | Gunpowder (Optional) |
| Healing II | Glistering Melon Slice | Glowstone Dust | Gunpowder (Required for Combat) |
| Invisibility (8:00) | Golden Carrot | Fermented Spider Eye | Redstone Dust (For Duration) |
Remember that the automation process is all about consistency.
A single broken input pipe or a misplaced ingredient slot can ruin an entire batch of expensive potions.
Considering the high cost of Glowstone Dust and Blaze Powder, which of these crucial potions do you think provides the best return on investment for long-term faction defense?
Factions Resource Recommendations: Prioritizing Ingredients
The Automation Mindset: Volume Over Scarcity
When you shift from manual brewing to using the Crafter block, your resource needs change completely.
You are no longer concerned with finding just enough for one raid. You need industrial-scale supplies.
To truly maximize the Crafter’s potential, you have to feed it ingredients that practically farm themselves.
This ensures your brewing supply chain never breaks down, even during long raid sessions or intensive Minecraft PvP practice drills.
Nether Wart: The Non-Negotiable Foundation
Nether Wart is the absolute base ingredient for nearly every combat-ready potion you will brew.
If your Nether Wart supply fails, your automated brewing system stops instantly.
Fortunately, Nether Wart farms are incredibly stable and easy to automate, making them your top priority.
A simple flooded farm with pistons or dispensers can yield thousands of warts an hour with minimal maintenance.
Focus on scalability here. You need enough to keep dozens of Crafters busy 24/7.
Powering Potions: Blaze Rods and Ghast Tears
Once you have the Awkward Potions (which requires Nether Wart), you need modifiers like Blaze Powder and Ghast Tears.
Blaze Rods: The Fuel of Strength
Blaze Rods are essential because they turn into Blaze Powder, used for Strength potions and as brewing stand fuel.
If you build an effective, safe Blaze farm in the Nether, you can automate rod collection easily.
Using a drop chute and hopper system, these farms provide a consistent, high-volume income stream necessary for the Crafter.
You can even set up a secondary Crafter just for converting rods into powder, which then feeds the main potion line.
Ghast Tears: A High-Value Challenge
Ghast Tears create Regeneration potions, which are extremely valuable in PvP scenarios.
While Ghasts can be farmed, their systems are generally more complex and yield is often lower than Blazes or Wither Skeletons.
If you are in a small faction, you may need to dedicate a player or two to manual Ghast hunting in the Nether’s wide open spaces.
If you have access to specialized mob grinders, prioritize a Ghast grinder, but remember this ingredient is usually the bottleneck.
Prioritizing Secondary Additives for Automation
Don’t forget the ingredients that turn your Awkward Potion into something useful-like speed, healing, or defense.
The best ingredients are those that rely on simple, observer-based farms or static mob drops.
This keeps the input logistics simple for your Crafter setup.
Consider the following high-priority resources:
- Sugar (Speed): Harvested from simple, large-scale sugarcane farms using observers and pistons. Extremely high volume, zero maintenance.
- Magma Cream (Fire Resistance): Comes from Magma Cubes, which are highly farmable in the Nether. Essential for raiding bases.
- Glowstone Dust (Level II Potions): Often sourced through trading with villagers, but can be mined easily if you have access to a fortresses.
- Spider Eyes (Poison): Automated from standard mob grinders. Easy to stock large quantities quickly.
To illustrate the efficiency difference, look at how much quicker a sugarcane farm replenishes compared to hunting Ghasts:
| Ingredient | Potion Type | Ease of Automation | Supply Consistency |
|---|---|---|---|
| Nether Wart | Base | Very High | Excellent |
| Sugar | Speed | Very High | Excellent |
| Blaze Rods | Strength/Fuel | High | Good |
| Ghast Tears | Regeneration | Medium-Low | Poor/Variable |
By focusing your automation efforts on the “Very High” and “High” rated ingredients, you ensure your Crafter system runs constantly.
The Power of Consistency
Automated systems thrive on reliable input. The more stable your ingredient source, the less often a member of your faction has to go manually fix things.
When you combine high-yield Nether Wart farms with a powerful Blaze system, you solve the input problem for the majority of your combat potions.
This frees up faction members to focus on mastering advanced PvP strategies, rather than standing around waiting for sugarcane to grow.
Given the different levels of difficulty, how do you decide whether to spend time perfecting a complex Ghast farm or simply buying the tears from other players or server shops?
Modular Tier 3 Brewing Hub Blueprint: 4-Recipe Automation
Why You Need the 4-Recipe Modular Hub
In Factions, preparation is everything. Waiting for potions to brew manually while a raid timer counts down is simply not an option.
The Tier 3 Modular Hub is designed to solve this crisis by automating your four most critical PvP resources simultaneously.
This blueprint focuses on high-volume production of Instant Health II, Strength II, Speed II, and Fire Resistance.
If you’re serious about competing on Bedrock Factions servers, maximizing your brewing efficiency is non-negotiable.
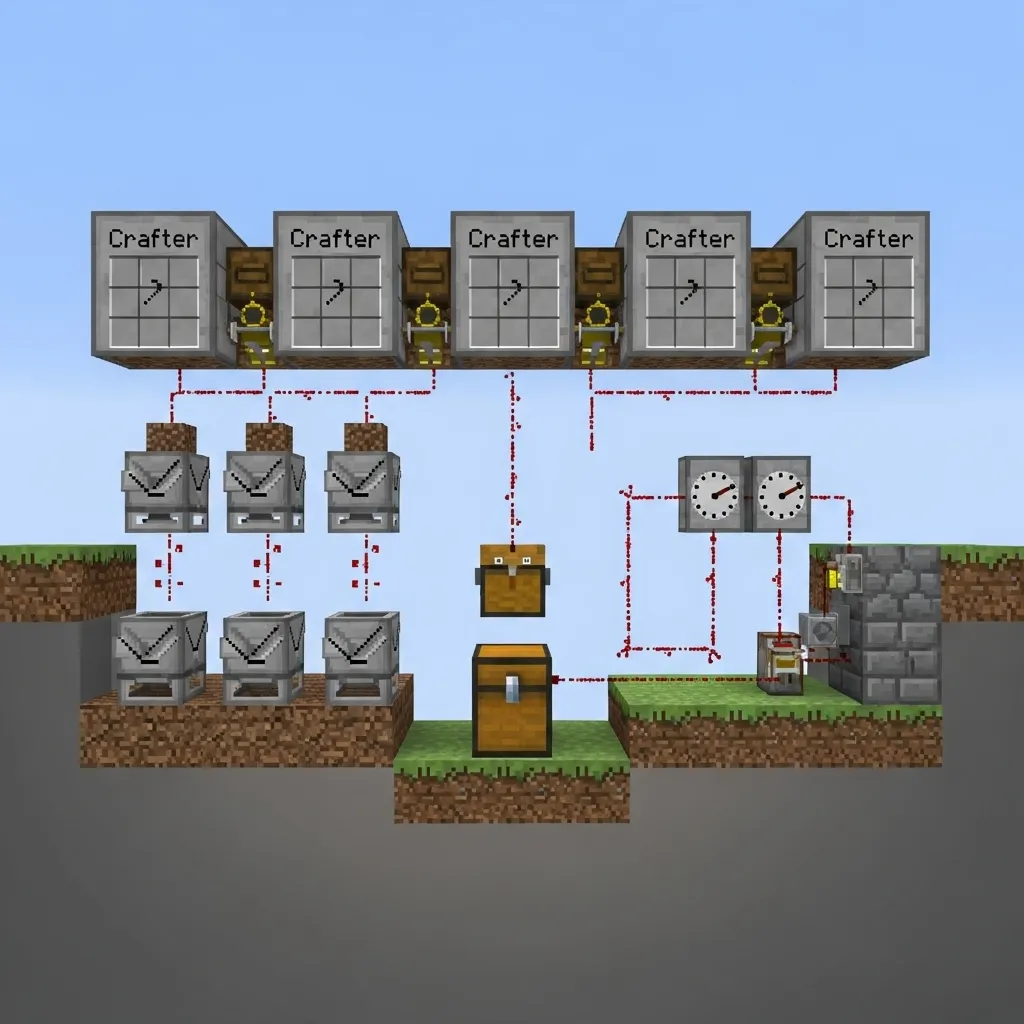
Designing the Centralized Ingredient Input
The key to a successful modular system is separating the input streams while centralizing the initial Awkward Potion base.
You will dedicate four separate Crafter blocks, one for each specific potion recipe.
Below each Crafter, a chain of hoppers leads back to a central input chest, where glass bottles are first filled with water, then dispensed into Awkward Potions.
This setup ensures that ingredient bottlenecks are eliminated, allowing you to focus only on refilling the core materials.
Mapping the 4 Essential Recipes
Each Crafter needs to be pre-programmed with a specific recipe pattern. We use three ingredient slots for the maximum effect potions (Tier II versions).
The beauty of the Crafter is that once you set the pattern, you only need to ensure the ingredients are available in the corresponding hopper columns.
A bar chart illustrating the approximate usage percentage of key PvP potions: Instant Health II (35%), Strength II (30%), Speed II (20%), and Fire Resistance (15%).
Here is the required sequence for the four dedicated Crafters:
| Crafter Station | Base Potion | Ingredients Needed |
|---|---|---|
| Crafter 1: Health | Awkward Potion | Glistering Melon Slice, Glowstone Dust |
| Crafter 2: Strength | Awkward Potion | Blaze Powder, Glowstone Dust |
| Crafter 3: Speed | Awkward Potion | Sugar, Glowstone Dust |
| Crafter 4: Defense | Awkward Potion | Magma Cream |
Note that for Fire Resistance, you usually don’t need the Glowstone Dust, as the Tier I duration is sufficient for most raid scenarios.
Timing the Redstone Pulses for Brewing Efficiency
The Crafter does not automatically manage the timing needed for potion brewing.
A standard Brewing Stand takes 20 seconds for each ingredient step.
You need to power the Crafter with a signal that is just long enough to activate the crafting, but only after the brewing stand has finished its cycle.
The simplest method is a hopper timer with comparators, or a precise observer clock connected to the Crafter input lines.
Ensure your redstone signal for the Crafter is isolated. It should only fire after the Awkward Potions are ready for the first ingredient.
This prevents the Crafter from wasting resources by trying to add an ingredient to a water bottle.
For Factions survival, automating mundane tasks like this frees you up to focus on strategy and advanced utility item usage in combat.
Considering how quickly ingredients can be consumed, what is the best way to monitor four different input chests across a large Faction base?
Comprehensive Design for Multi-Recipe Systems
Why Multi-Recipe Systems Win Factions Wars
In a serious Factions environment, you can’t just rely on one type of potion.
You need a full arsenal ready for raiding, defending, and intense PvP battles.
Think about your PvP loadout: Speed II, Strength II, Healing II, and Fire Resistance.
Trying to brew these manually when you are under fire is simply impossible.
The Crafter block lets us automate this entire process efficiently.
A comprehensive design handles 4 to 6 different recipes without needing manual intervention, keeping your vault stocked.
Ingredient Multiplexing: The Key to Versatility
The secret to running multiple recipes simultaneously is careful ingredient handling.
We are going to use several Crafters, but they all feed materials into the same standard Brewing Stand setup.
The main ingredient that determines the potion type (like Sugar for Speed) must be controlled precisely.
This precision is why the Crafter’s ability to lock slots becomes so crucial for organization.
The Standard Factions Potion Loadout
Here is an example of the four most common potions a faction needs access to immediately.
Each recipe starts with an Awkward Potion, which requires Nether Wart.
| Potion Type | Unique Ingredient | Factions Use Case |
|---|---|---|
| Speed II | Sugar | Raiding, scouting, and quick escapes |
| Strength II | Blaze Powder | Maximizing burst combat damage |
| Healing II | Glistering Melon | Instant health recovery during fights |
| Slow Falling | Phantom Membrane | Countering critical fall damage or the Mace |
To automate 4 distinct recipes, you will need 4 separate Crafter blocks.
Each Crafter is dedicated to dispensing only one unique, recipe-starting ingredient.
Implementing Independent Recipe Control
Each Crafter should have its own input chest filled only with its responsible material (e.g., only Sugar).
You use Redstone dust and a mechanism, usually a lever or a button with a T-Flip Flop, to selectively activate one Crafter at a time.
This process prevents Sugar from contaminating the Strength potion recipe queue.
Timing is everything: the Crafter must dispense the first ingredient, wait for brewing, then dispense the secondary modifiers like Redstone or Glowstone.
You must use carefully timed repeaters and pulse extenders to manage the full brewing cycle, which takes about 20 seconds per stage.
A bar chart comparing the estimated active player time needed to brew 36 potions (12 cycles) using different methods. Crafter automation minimizes active input time to less than 30 seconds for setup, saving crucial time.
This reduction in active time is the main reason Factions leaders invest heavily in these setups.
Less time managing brewing means more time focusing on mastering advanced vertical knockback and spacing techniques in PvP.
Scaling Up to Six Recipes
To scale up to six recipes, you simply add more modules side-by-side.
Each new potion, such as Invisibility or Turtle Master, requires its own dedicated Crafter feeding station and control switch.
All these dedicated ingredient lines must eventually converge and feed into the single main array of Brewing Stands.
While the Redstone footprint grows, the efficiency gained in controlling your resource flow is unmatched, especially when competing on advanced Bedrock Factions Servers.
What specific complex potion (like Potion of the Turtle Master) do you think benefits the most from this kind of comprehensive Crafter automation?
Basic Redstone Schematics for Automated Input Timing
Why Timing is Everything (The 20-Second Rule)
Automated potion brewing in Factions is all about patience and precise timing.
Think of the brewing stand like a specialized oven for combat supplies.
It takes exactly 20 seconds (400 Minecraft ticks) for one ingredient to mix into the base liquid.
If your Redstone circuit drops the next ingredient even one tick too early, the previous brewing cycle might be ruined.
This means your circuit needs to perfectly count 20 seconds before activating the Crafter again.
Building the Reliable Hopper Clock Timer
The most dependable way to create a consistent, long delay in Minecraft is to use a hopper clock.
This is essentially a digital hourglass. You control the duration by changing the amount of stackable items inside the hoppers.
A standard 20-second brewing cycle requires a precise number of items.
A bar chart showing how many items are needed in a hopper clock to achieve certain time delays in seconds. Approximately 95 stackable items are needed for the 20-second brewing time.
To construct the clock, you will need two hoppers facing each other, two comparators, and two sticky pistons with blocks attached.
To reach the 20-second mark, place exactly 95 inexpensive, stackable items (like dirt or cobblestone) into one of the hoppers.
Setting up the Timing Loop
When all the items transfer from the first hopper to the second, the signal output from the comparator flips.
This Redstone pulse is the signal you need to activate your Crafter.
Your ultimate automated setup, producing powerful Strength II or Speed II potions, will require the timer to cycle three separate times.
Each cycle controls a different stage of the brewing process: water, ingredient, and enhancement.
Wiring Inputs to the Crafter for Sequencing
The Crafter block makes automated ingredient dropping much cleaner than old-school dispensers.
Remember, the Crafter only activates once per Redstone pulse and only ejects items from open slots (not marked with a red X).
You need to decide which block handles the base input (water bottles) and which handles the ingredients.
We recommend using a separate dropper to feed water bottles into the base of the brewing stand.
Then, the Crafter sits next to the stand, pushing ingredients directly into the top slot.
Three Phases of Automated Brewing
Since faction warfare relies on having potions ready quickly, optimizing your brewing output is essential.
Whether you are defending your claim or getting ready for a big raid, preparation is key.
High-level combat relies on knowing your gear and strategies, and this includes quickly restocking your potions.
You want to be sure you have fresh supplies before engaging in fast-paced combat strategies like Master Advanced Trident PvP Movement in Bedrock Edition.
Here is the required sequencing controlled by your 20-second hopper clock:
- Phase 1: Water Bottle Input: The first pulse starts the brewing process by placing the water bottle base.
- Phase 2: Primary Ingredient (Nether Wart + Effect): The second pulse drops the first key ingredient, transforming the awkward potion.
- Phase 3: Enhancement (Dust): The third pulse drops Redstone or Glowstone to increase duration or potency, respectively.
The Crafter allows you to load up stacks of different ingredients and then only activate the necessary slot using the timing circuit.
This means less monitoring for you and more potions for your faction.
What is the most challenging aspect of implementing large-scale Redstone automation on a high-lag Factions server?
Advanced Logic: Preventing Ingredient Contamination and Timing
Guarding Against Ingredient Contamination
When you automate brewing, the biggest threat isn’t TNT-wielding raiders.
It’s ingredient contamination. This happens when the wrong item gets sucked into the crafter too early.
Imagine wasting a stack of expensive Nether Wart just because Redstone dust entered the mix first.
If you mess up the sequence, you might end up with a useless potion, or even a corrupted splash potion of weakness.
To prevent this, we need smart filtering and precise redstone controls that act like a traffic cop for ingredients.
| Potion Stage | Standard Ingredient | Brew Time (Ticks) |
|---|---|---|
| Start Base | Water Bottle + Nether Wart | 400 |
| Tier 1 Effect | Awkward Potion + Primary Item (e.g., Magma Cream) | 400 |
| Extension | Redstone Dust | 400 |
| Amplification | Glowstone Dust | 400 |
Notice how critical the 400-tick delay is. Every single step must wait 20 seconds before the next ingredient is added.
The Crafting Lock: Using Comparators
The Crafter block makes automated input super easy, but that ease is also a serious contamination risk.
We need a way to lock the hopper line feeding the Crafter until the current brewing cycle is 100% finished.
This is where the humble redstone comparator becomes your best friend.
The comparator can detect the brewing stand’s activity state.
When the brewing stand is running, it outputs a redstone signal strength of 1.
When the brewing is finished, the signal strength instantly drops back to zero.
You use this signal of 1 to power a block right next to your input hopper.
When the block is powered, the hopper locks up, and ingredients cannot pass through it.
This precise logic is vital for mass production, especially if you are stocking up for high-stakes PvP.
Understanding these automated delays is just as important as knowing which Minecraft Tools will give you the fastest efficiency ratings.
Calculating the Perfect Crafter Delay
Since each brewing step takes exactly 20 seconds, your redstone circuit must generate an output pulse of that length.
If the pulse is too short, you ruin the potion. If it’s too long, you waste valuable Factions time.
To calculate the delay, we convert the time into redstone ticks, where one second equals 20 ticks.
The total time needed is 20 seconds, which means we need a 400-tick delay.
Since one redstone repeater set to max delay only gives you 4 ticks, you need quite a chain.
A bar chart showing the delay (in seconds) per setting on a redstone repeater: Setting 1 (0.1s), Setting 2 (0.2s), Setting 3 (0.3s), Setting 4 (0.4s).
To achieve 400 ticks, you need a chain of 100 repeaters set to the maximum 4-tick delay.
Alternatively, you can use a hopper-comparator clock. This uses two hoppers facing each other and a precise number of items inside.
For example, 22 items being transferred back and forth will give you the near-perfect 20-second timing.
This reliable timing ensures your potion is ready and prevents the crafter from firing the next stage prematurely.
What is the most complex potion recipe you have tried to automate successfully?
Implementing Item Prioritization Logic
The Ingredient Traffic Jam
Imagine your automated brewer as a busy kitchen. If you throw all the ingredients in at once, you get chaos instead of a perfect potion.
The Crafter block is amazing, but it has no “brain” to know which item needs to go into the brewing stand next.
If you aren’t careful, you might accidentally mix a Redstone Dust (for duration) when you meant to add Glowstone (for potency).
In Factions, resource efficiency is king. Wasting expensive items like Ghast Tears or Golden Carrots is just unacceptable.
Controlling Flow with Filtered Hoppers
The key to perfect automation lies in managing the flow of ingredients before they even hit the Crafter.
We need to create a strict priority list, often using specialized hopper filters. Think of them as bouncers at a club.
The hopper filter ensures that only one type of ingredient can pass through at a time, preventing accidental mixing.
This is usually achieved by partially filling slots in the hopper so that only one open slot remains for the desired item.
The most crucial part of brewing is adhering to the chemical steps exactly:
- Nether Wart (Base Potion)
- Primary Effect Ingredient (e.g., Blaze Powder, Magma Cream)
- Modifier (Redstone, Glowstone, or Gunpowder)
If the Crafter gets the modifier before the primary ingredient is done, the entire batch is ruined instantly.
Implementing Time-Locked Input Stages
To prevent ingredient mixing, you must use Redstone to temporarily lock down the ingredient hoppers.
The brewing stand takes about 20 seconds (400 ticks) to complete one brewing cycle.
Your redstone circuit needs to account for this delay and only activate the next hopper when the current stage is finished.
An observer watching the brewing stand’s inventory or a comparator reading the progress is essential for reliable timing.
A bar chart comparing brewing efficiency over 100 batches: Manual (75% success), Unfiltered Crafter (85% success), and Filtered & Timed Crafter (98% success).
By using timed delays, you prevent the machine from spamming all items into the crafter at once.
This strict prioritization is especially vital when dealing with complex buffs needed for PvP practice drills or faction raids.
Crafter Slot Allocation Strategy
Remember that the Crafter block always tries to insert items into the earliest available slot.
For automated brewing, we only care about the top center slot, which is the only one that interacts with the brewing stand above it.
You must prevent ingredients from entering any of the eight other slots if you are using the Crafter purely for brewing logistics.
A smart way to ensure proper input is to feed the hopper directly above the Crafter, ensuring the item is aimed at the correct central slot location.
Since the Crafter itself lacks internal prioritization, your external filtering must be absolutely perfect.
We strongly recommend using completely separate, dedicated input lines for each brewing stage.
- Input Line 1: Delivers Nether Wart only.
- Input Line 2: Delivers the Primary Ingredient (e.g., Ghast Tear, Golden Carrot).
- Input Line 3: Delivers the final Modifier (Redstone or Glowstone).
Each line should be connected to a dropper or dispenser aimed into a single, timed Crafter input point.
This physical separation makes it much easier to troubleshoot when things inevitably go wrong and helps you avoid critical failures during high-stakes moments.
The stakes are high in Factions, and automating your supply chain removes the biggest variable: human error.
How does the resource cost saved by perfect automation compare to the Redstone investment needed to build and maintain the complex timing systems?
Using Filter Systems for Resource Management
The Problem: Crafters Don’t Sort Ingredients
Building a single automatic potion brewer using the Crafter is pretty easy. But Factions require lots of potions, so you need a whole factory.
When you connect multiple Crafters, you run into a huge problem: ingredient chaos.
Imagine one Crafter is trying to make basic Potions of Healing, and another is trying to turn those into Splash Potions.
If the gunpowder meant for the splash recipe accidentally flows into the healing Crafter, your whole chain breaks down instantly.
We need a brain for our brewing system, and that brain is the hopper filter system.
Designing the Automated Supply Chain
In a large-scale Factions base, efficiency is everything. You cannot afford to manually check every brewing stand for contamination.
Automated filtering solves this by creating dedicated pathways for every single resource.
This is crucial because Crafters will pull items from adjacent inventories without discrimination, ruining your carefully planned recipes.
How a Basic Hopper Filter Works
A classic hopper filter ensures that only one specific type of item can pass through a connected hopper line.
This “item lock” mechanism uses redstone components like a comparator, a repeater, and a standard redstone torch to stop the flow until a specific threshold is met.
Inside the filtered hopper, you need five total item slots filled:
- Slot 1: The primary ingredient you want to filter (e.g., Glowstone Dust).
- Slots 2-5: Filler items (like renamed cobblestone) that stack only to 1, blocking other items.
The system is calibrated so that only when enough of your desired ingredient enters Slot 1 does the redstone signal activate.
This activation allows the item to flow to the Crafter or brewing stand below.
Applying Filters to Potion Stages
In a powerful automated brewing array, each Crafter handles one precise stage of the potion process.
You must have dedicated, filtered input lines for both the initial ingredients and the secondary modifiers.
This prevents common ingredients like Redstone (for duration) from reaching a Crafter intended only for Glowstone (for potency).
| Crafter Purpose | Filtered Ingredient (Input) | Critical Resource Management Role |
|---|---|---|
| Base Potion Creation | Nether Wart | Feeds the entire factory with Awkward Potions. |
| Potency Modifier | Glowstone Dust | Creates strong potions, essential for PvP recovery. |
| Duration Modifier | Redstone Dust | Extends buffs like Swiftness or Fire Resistance. |
| Splash/Lingering Finalizer | Gunpowder/Dragon’s Breath | Converts drinkables into throwables for combat use. |
By using isolated, filtered channels for each modifier, you ensure that your precious, high-volume ingredients are never wasted.
If you are serious about having enough potions for high-intensity Factions PvP practice drills, this level of management is necessary.
The Demand for Modifier Filtering
The types of potions used in competitive Factions usually follow a pattern. Potency and splash are almost always the highest priorities.
This high demand makes reliable filtering for Glowstone and Gunpowder your absolute priority, as these are consumed faster than anything else.
A bar chart showing the approximate consumption of potion modifiers in Factions environments: Glowstone Dust (55%), Gunpowder (30%), and Redstone Dust (15%).
The data clearly shows that your flow rate for Glowstone Dust needs to be massive and flawless.
A small filtering error here means 55% of your needed upgrades fail.
Automated resource management is the key to maintaining a massive, consistent stockpile of fighting supplies, giving your faction a massive edge.
How might advanced players use redstone to create a prioritized filter system?
This system ensures that high-demand potions like Instant Health II are always made before lower-priority items.
Embracing the New Era of Factions Automation
The introduction of the Crafter block is nothing short of a revolution for high-stakes Factions gameplay.
We have finally moved past the era of slow, massive, and easily breakable dispenser setups.
The Crafter system offers unparalleled speed, compactness, and reliability exactly when your team needs it most.
Being able to quickly restock hundreds of crucial splash potions is the edge that wins raids and defends against determined enemies.
If you haven’t yet integrated this powerful new block into your base design, you are truly working against the current Factions meta.
Upgrade your base, save valuable space, and make sure your brewing process is as streamlined and secure as your strongest vault wall.
Frequently Asked Questions
What is the main advantage of the Crafter over a dispenser system for brewing?
Speed and compactness. Crafters handle item placement instantly and require far fewer Redstone components.
This makes the brewing build smaller, faster, and much simpler to hide and protect inside a Factions base core.
Does the Crafter speed up the actual brewing time of 20 seconds per step?
No, the 20-second brewing timer is controlled by the Brewing Stand itself and remains constant.
However, the Crafter drastically reduces the preparation time-the seconds needed to load ingredients and start the next batch.
This massive improvement in throughput means you finish entire chests of potions much faster.
Why were old dispenser arrays prone to failure on Factions servers?
Dispenser systems rely on complex Redstone timing circuits and physical item aiming to hit the Brewing Stand.
Server lag, which is common on busy Factions servers, often causes these delicate timings to desynchronize or break.
When the timing fails, potion batches are ruined, or the machine locks up entirely.
How does the Crafter contribute to better base security?
Dispenser systems were bulky, requiring long lines of vulnerable Redstone components.
The Crafter allows you to build a system that is highly compact, often requiring only a 2×2 footprint.
This means you can easily hide your automated production line in a smaller, deeper, and much better-protected area of your base.