Want to one-shot enemies without building a huge tower? The Mace is powerful, but it needs height.
I’ll show you how to use a simple Wind Charge trick to launch yourself instantly and land a devastating critical hit every time.
It’s time to change how you PvP.
Key Takeaways
- The Wind Charge acts like a portable trampoline for instant height.
- You must jump within 1-2 ticks of the explosion to maximize lift.
- Swap to the Mace immediately after launching to prepare the strike.
- Hitting the enemy on the descent guarantees a massive critical smash.
The Instant Crit Mechanic: Understanding Ground Boost Physics
The Mace is an incredibly powerful weapon, but it has one big catch that players need to exploit.
You only get that insane, game-changing damage boost if you fall a significant distance before your strike connects.
This is the core of the instant critical hit mechanic, and it relies entirely on generating massive vertical momentum.
Normally, getting high enough quickly means slow pillar building or hoping an enemy launches you high into the sky.
The Physics of the Controlled Launch
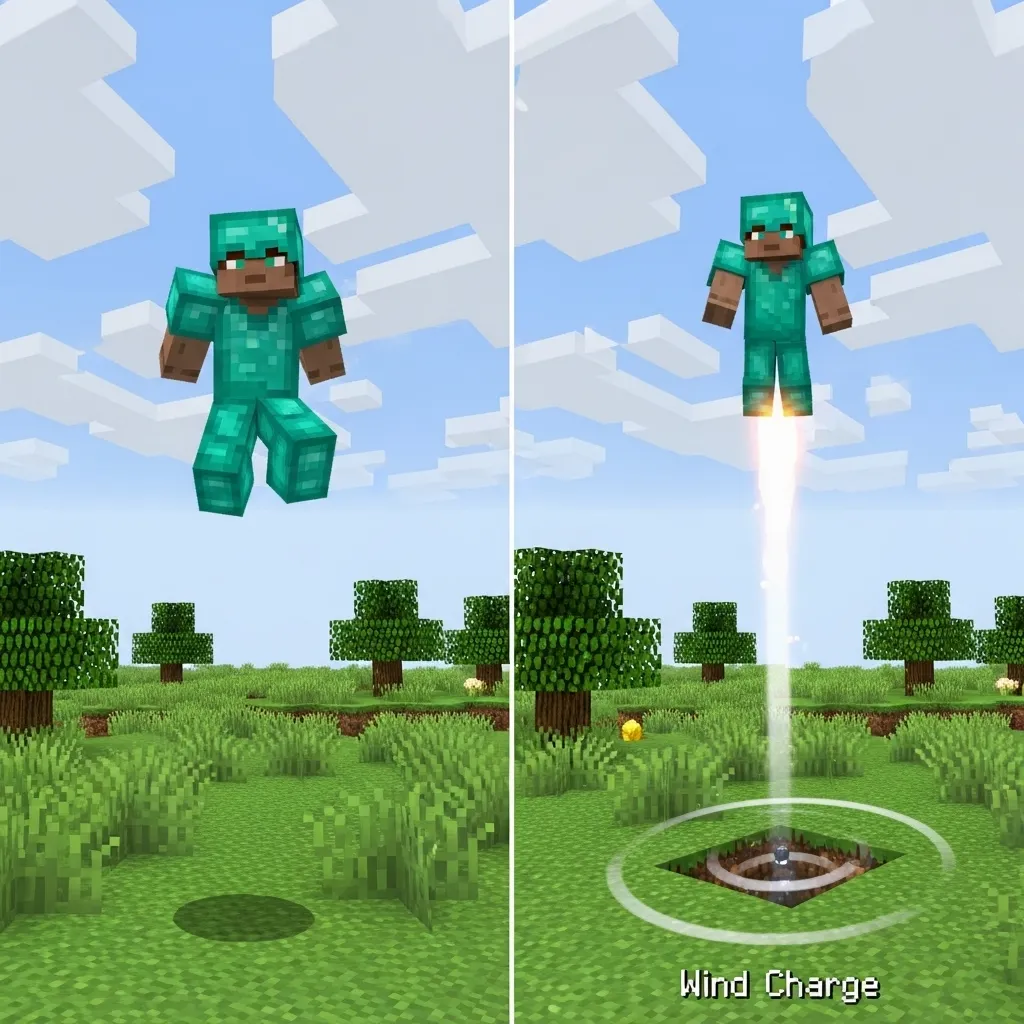
The Wind Charge changes everything. It acts like a highly controlled, single-use vertical boost.
When you fire a Wind Charge at the ground right beneath you, it creates a sudden, powerful upward force.
This is what we call the “Ground Boost,” and it leverages a simple Minecraft physics quirk: rapid vertical acceleration.
The momentum you gain from the blast is what counts as your initial launch height, even if you don’t travel dozens of blocks.
Crucially, the instant you reach the peak of that short trajectory and begin falling, the game registers that rapid change in vertical velocity.
It’s this brief moment of freefall, starting from maximum Wind Charge height, that enables the instant critical hit.
The goal isn’t huge height; it’s maximizing the upward acceleration followed by an immediate, deadly descent.
Key Steps for Maximizing Boost Damage
Executing this technique perfectly relies on precise timing and positioning.
- Perfect Proximity: The Wind Charge must detonate on the block directly beneath your feet for the tightest, highest launch.
- Swap Timing: As soon as you feel the upward momentum start to slow down, you must already be swapping to your Mace.
- The Quick Strike: Attack the enemy immediately as you start your fall. The hit must connect before you lose the critical momentum.
- Horizontal Control: Unlike longer falls, you must maintain excellent horizontal aim, as the window for connecting the hit is very short.
The maneuver happens incredibly fast, which is its main advantage in high-level PvP.
The speed delivers an instant damage spike that opponents often cannot counter with shields or quick healing.
Because the boost is so controlled, it’s often safer and more reliable than trying to use complicated momentum techniques involving Ender Pearls.
This simple ground blast is now the gold standard for reliably generating critical mace damage.
Its effectiveness has dramatically changed the PvP landscape since 1.21 dropped.
A pie chart showing preferred primary melee weapon usage in 1.21 PvP: Mace (45%), Sword (30%), Axe (25%).
If you can master the timing between the charge, the boost, and the strike, you turn a small disposable item into a one-shot opportunity.
It forces every player to adjust their defensive strategies immediately.
This mechanic proves that sometimes, the smallest items can have the biggest impact on combat physics.
Now that we understand how the boost works, what other seemingly simple utility items might be hiding instant kill mechanics in future updates?
Precision Execution: The Wind Charge Ground Boost Setup
The Mechanics of Instant Vertical Lift
Landing the instant mace critical hit isn’t just luck; it demands surgical precision.
This tactic, often called the “Ground Boost,” uses the Wind Charge explosion to maximize your vertical gain in a fraction of a second.
The core rule of the Mace is simple: the further you fall, the harder you hit.
By boosting straight up from the ground, we turn a tiny hop into several blocks of deadly drop height.
Think of the Wind Charge as a tiny, highly pressurized trampoline that launches you skyward right before you swing.
If you want to master the timing, check out our guide on mastering the Wind Charge double jump timing.
A bar chart comparing average height gain: Standard Jump (1.25 blocks) vs. Wind Charge Ground Boost (4.5 blocks).
As you can see, the boost gives you over three times the vertical travel compared to a regular jump.
This sudden increase in distance is exactly what the Mace needs to deal maximum, critical damage to an opponent.
Step-by-Step Execution Checklist
Executing this combo perfectly requires coordination between your movement, item hotkeys, and attack clicks.
We are aiming for simultaneous lift-off and weapon swap.
Lock the Target: Identify your enemy and get close. The Wind Charge needs to explode right under your feet or right between you and the enemy.
Throw the Charge: Quickly hotkey to the Wind Charge and throw it directly down or slightly forward.
The Critical Jump: The instant you see the small puff of smoke from the explosion, hit your jump key.
You must jump within the first 1-2 game ticks of the explosion to get the full “Ground Boost” effect.
The Swap and Smash: As you shoot upward, swap quickly to your Mace.
Hit the enemy while you are beginning to fall but are still higher than them. This registers the fall damage bonus.
Practice the timing until it feels like one single, fluid motion: throw, jump, swap, and strike.
The speed of this whole sequence means the enemy has almost no time to react or try to shield.
Why Timing the Ground Impact Matters
The success of the Ground Boost relies on minimizing the horizontal knockback while maximizing the vertical launch.
If you throw the charge too far ahead, you get knocked backward and miss the instant lift.
If you throw it too late, the explosion may happen after your jump, only giving you a small extra boost.
We are trying to synchronize the upward force of the blast with the initial momentum of your character’s jump.
This whole maneuver is designed to leverage the Mace’s unique power structure.
For more general strategies on using the mace effectively, we have a complete guide available.
What is the hardest part of this combo for you to consistently pull off: the timing of the jump, or the speed of the hotkey swap?
Critical Timing: Mastering the Input Window
The Millisecond Difference
The “Wind Charge Ground Boost” combo is ridiculously powerful, but its success relies entirely on something we call the input window.
Think of the input window like a tiny, flashing button that appears for only a moment during a boss fight.
You have to press it perfectly. Miss this window by a few milliseconds, and your huge, devastating mace attack turns into a gentle flop.
This technique is not just about aiming; it’s about mastering the rhythm of the game’s physics engine.
Understanding the Crit Window
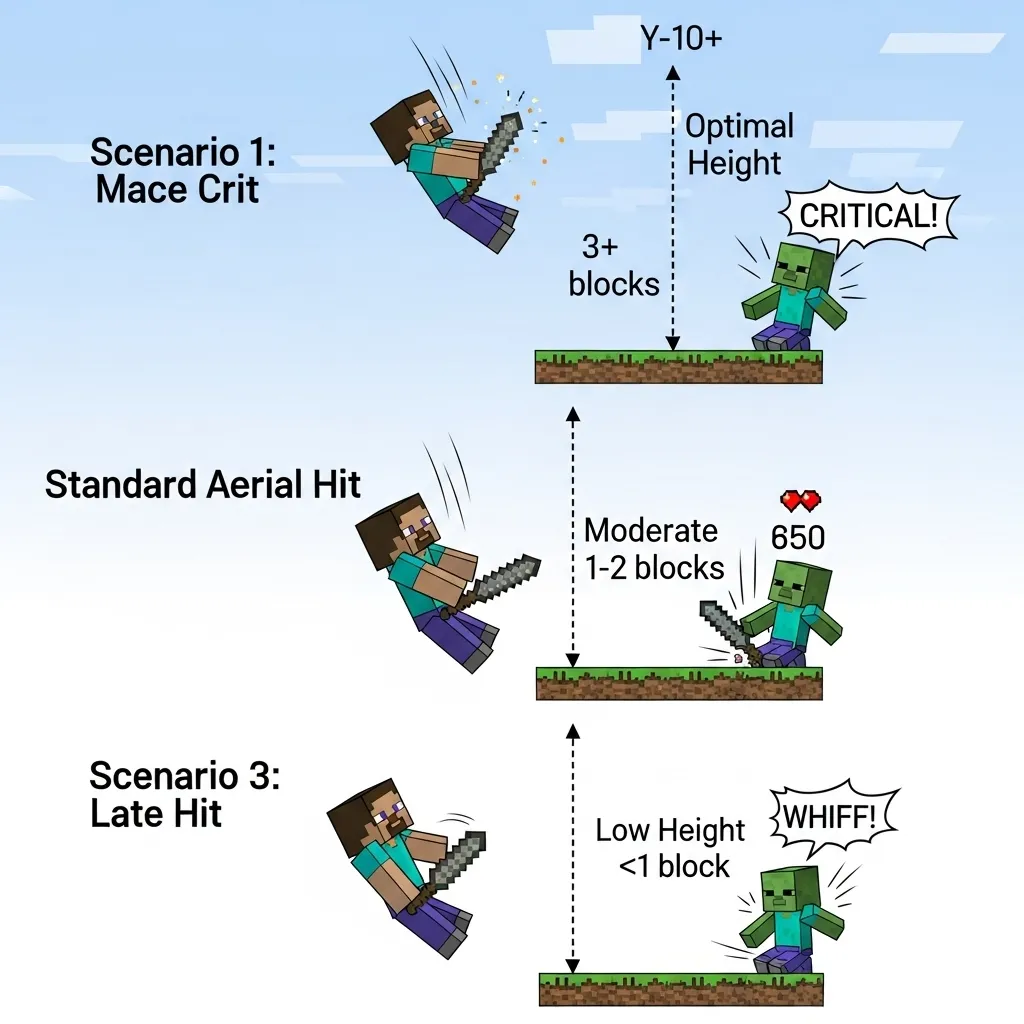
The Mace’s smash attack registers a critical hit based on how far you have fallen before impact.
The Wind Charge launches you up, but the game waits until you start actively accelerating downward before the critical hit multiplier activates.
This critical moment happens after the initial upward momentum stops and gravity begins pulling you down significantly.
The sweet spot for the input is extremely tight-often less than 5 game ticks, or about 250 milliseconds, depending on your altitude.
If you hit too early (while still moving up), you get a weak hit. If you hit too late, you miss the boost entirely and land safely.
Training Your Timing
This combo requires pure muscle memory. You cannot reliably track the exact moment visually, especially in the chaos of PvP.
You need to internalize the sound and feel of the launch.
If you want to fine-tune your launch, check out our guide on mastering Wind Charge double jump timing. It’s all about creating the maximum height for the crit.
Practice launching yourself near walls or low buildings to get a reliable frame of reference for how quickly you descend.
Key Indicators for the Perfect Click
- The Apex Pause: Listen for the moment your upward velocity clearly slows down to zero.
- Visual Acceleration: The world should visibly start rushing past you as you begin falling rapidly.
- Low Altitude Strategy: If you are starting low, the window is almost instant. You must click the attack key immediately after the Wind Charge pushes you.
To put this required timing into perspective, we can compare it to human reaction speed.
The average simple human reaction time to a visual cue is about 250 milliseconds (a quarter of a second).
The window for the guaranteed, perfect ground boost crit can be as short as 100 milliseconds when executed flawlessly.
This shows why practice is essential-you need to act before your brain has time to fully process what is happening.
A bar chart comparing the optimal critical hit window (around 100ms) to average human reaction times (250ms), showing how tight the timing is for this advanced move.
Dealing with Input Delay
Your hardware and connection speed heavily influence your success here.
High latency (lag) can completely ruin this precise timing, making your input late to the server.
If you play on a high-ping server, you may need to anticipate the impact and click slightly earlier than you feel is natural.
This is a major reason why many top players work hard to fix Minecraft PvP input lag using client settings and optimization.
Once you nail this timing, you move from relying on luck to guaranteeing massive critical damage with the mace.
Are there any other high-risk, high-reward combos that rely on such exact timing?
Troubleshooting: Why Your Mace Crits Are Failing
It’s the worst feeling when you successfully pull off the Wind Charge setup, only for your powerful Mace crit to vanish.
You soar high, you slam down, and… nothing. You just hit a standard blow instead of an instant knockout.
This specific combo is incredibly powerful, but its timing window is smaller than a half-slab.
Let’s break down the common reasons why your “instant” Mace crits are failing, focusing on execution and technical issues.
The Critical Timing Window (Too Early or Too Late)
The single biggest reason this combo fails is faulty timing. You must hit the enemy during a tiny window of opportunity.
The Mace crit, triggered by the inherent Slam ability, requires you to connect precisely as you transition from falling to touching the ground.
If you swing while still airborne, the game registers a standard aerial attack.
If you swing a millisecond after landing, the ground boost effect has already expired.
Think of it like perfectly timing a jump rope. You need to swing the mace right when the rope hits the floor.
Wind Charge Placement and Vertical Height
The Wind Charge’s role is to give you enough vertical drop to activate the Mace’s damage multiplier.
If you launch the charge too far away, or aim it too horizontally, you won’t get the necessary height for the massive crit bonus.
You need to use the Wind Charge to launch yourself almost straight up, maximizing the distance you fall.
If you are struggling with the basic mechanics, make sure you understand the initial launch.
Check out our guide on using Wind Charges in Minecraft PvP for foundational aiming tips.
The Latency Problem
Even if your timing is flawless on your monitor, the server might see things differently. This is high latency, or “lag.”
Latency is the delay between what you do and when the game server registers it.
If your ping is high, the server registers your landing later than you actually see it.
This means your perfectly timed ground hit might arrive at the server too late, outside the tiny critical window.
If you frequently miss these high-stakes, timed attacks, you might want to look at reducing your game’s delay. This is crucial for serious players.
We highly recommend learning how to fix Minecraft PvP input lag, especially when using timing-sensitive weapons.
A bar chart illustrating how higher latency (ms) severely decreases the estimated success rate of timing-sensitive PvP actions like the instant Mace crit.
Quick Fix Checklist for Failed Crits
Run through this list if your instant mace crits aren’t connecting:
- Server Ping: Is your latency under 80ms? Consistency drops dramatically above this point.
- Attack Direction: Did the Wind Charge launch you mostly vertical, not just horizontal?
- Slam Timing: Are you hitting the attack button just before you visually touch the ground block?
- Target Movement: Did your opponent move out of the direct vertical impact zone? You must land on them.
- Mace Enchantments: Are you using Density to increase the damage multiplier based on your fall?
This combo requires mechanical perfection combined with low latency to work reliably against skilled opponents.
Mastering this instant critical hit takes lots of practice and trial-and-error.
Now that you know what to watch out for, what single change in your setup do you think will boost your crit success rate the most?
Practical Mace Crit Applications & Damage Optimization
Mastering the Initiation and the Follow-Up
The wind charge ground boost is much more than just a movement gimmick-it’s an instant damage delivery system.
It allows you to bypass the long setup time needed to climb high and instead grants you maximum falling momentum in less than a second.
If you execute this correctly, you transform the Mace from a situational weapon into a guaranteed knockout punch.
This technique is all about quick initiation and breaking through an enemy’s defenses before they can react.
How to Guarantee the Mace Smash Damage
To maximize your damage, you need to hit the opponent on your descent from the highest possible point of the Wind Charge jump.
This rapid height generation is what generates the crushing critical hit, known as the “Smash” attack.
Remember that the Mace’s damage scales exponentially with the distance you fall.
The Wind Charge ensures you start falling from a distance that guarantees significant-often lethal-impact.
Executing this technique requires speed and careful timing. Even a split second delay can cost you the critical boost.
- Step 1: Get Close. You need to be right next to your target, preferably above or level with them.
- Step 2: Launch the Wind Charge. Fire the Wind Charge at the block directly beneath your feet. It should fire the moment you look down.
- Step 3: Wait for Apex. Allow the boost to propel you upward. You are generating fall distance during this ascent.
- Step 4: The Smash. Aim straight down and strike the enemy while you are beginning your fall. You must hit them before you land.
Damage Optimization with Density and Momentum
The Wind Charge works perfectly with the Mace’s unique enchantments, especially Density.
If you equip Density V, that enchantment alone adds a huge damage bonus for every block you fall.
The instant height provided by the charge makes this enchantment absolutely devastating.
This instant vertical attack is essential when trying to land a perfect “nuke” hit.
To really maximize the momentum and the guaranteed kill potential, mastering this vertical approach is key.
You can combine this with horizontal movement strategies, often referred to as the Mace Nuking strategy.
Comparing Instant Crit Damage Output
The numbers show exactly why this combination is so powerful. A standard jump attack gives you a tiny bonus.
The Wind Charge, on the other hand, guarantees you hit the high-damage threshold needed for an instant critical smash.
The chart below shows the estimated average hearts of damage a fully enchanted Mace (Density V) deals in common combat situations.
A bar chart comparing estimated Mace damage (in hearts) across different activation methods: Standard Jump (7.5 hearts), Ender Pearl Pop (15 hearts), and Wind Charge Ground Boost (25 hearts).
That immediate height difference pushes the damage past the point of survivability for most players not wearing top-tier protection.
It instantly executes an opponent instead of just dealing painful damage.
The Shield Bypass Application
One of the best uses for this technique is breaking through the opponent’s shield.
The critical smash attack ignores a large portion of armor value and temporarily disables a held shield, staggering the enemy.
If your opponent is turtling up and relying too heavily on their shield, the Wind Charge boost is the perfect counter.
It allows you to bypass their guard instantly, giving you a chance to follow up with a quick sword combo while they are defenseless.
For more specific ways to shut down defensive players, learning how to counter shield delay is an essential skill in the current PvP meta.
The Wind Charge boost turns the fight from a drawn-out horizontal exchange into a sudden, decisive aerial maneuver.
Which Minecraft game mode-like Skywars or Duels-do you think benefits the most from having this instant vertical advantage?