Ever feel like your amazing Minecraft world is just too big?
You build an awesome base, find a rare biome, or set up a new farm, but traveling between them takes forever.
It’s like spending half your game time just walking! and with efficient minecraft nether hub it becomes quite simple.
Key Takeaways
- A Nether hub uses the 8:1 travel ratio, where one block in the Nether equals eight in the Overworld, for super-fast travel.
- Properly calculating coordinates is essential to make sure your portals link correctly between dimensions.
- Building safe, enclosed, and well-lit tunnels is key to protecting yourself from mobs and lava.
- For maximum speed, upgrade your hub with advanced travel methods like ice boat highways or minecart systems.
Introduction: The Power of an Efficient Nether Hub in Minecraft
That’s where an efficient Nether hub comes in. Think of it as your personal, super-fast express train system.
By using the Nether’s special travel trick, where one block equals eight in the normal world can connect all your important locations and cut travel
time down to almost nothing. This guide will walk you through everything you need to know, from your very first portal to an advanced, high-speed network.
Ever felt like your amazing Minecraft world is just- too big?
You build an awesome base, find a rare biome far away, or set up a new farm. But then, traveling between these spots takes forever.
It’s like spending half your game time just walking!
That’s where an efficient Nether hub comes in. Think of it as your personal, super-fast express train system.
It’s a central station you build in the Nether dimension.
From this hub, you can connect to all your important locations in the Overworld, saving you tons of time. The secret sauce is how the Nether works.
For every one block you travel in the Nether, you actually cover eight blocks in the Overworld. This 8:1 ratio is a game-changer for long-distance travel.
Imagine cutting an 8,000-block Overworld journey down to just 1,000 blocks in the Nether! It’s incredibly powerful for extending your reach.
When you’re planning your portals, tools like a Nether portal calculator can be super helpful.
They ensure your portals link up perfectly, preventing frustrating misalignments. Building an efficient hub means you spend less time traveling.
You get more time doing what you love, like building epic structures or exploring new lands.
In fact, exploring is a huge part of what makes Minecraft fun for many players.
According to Statista, exploring makes up about 23% of how Minecraft players spend their time worldwide.
A pie chart showing how players spend their time in Minecraft: Building (27%), Exploring (23%), Mining/gathering resources (20%), Fighting/hunting (15%), and Other activities (15%).
Mining and gathering resources account for another 20%. Both activities often involve a lot of travel.
An efficient Nether hub directly impacts these numbers by making those journeys much quicker.

So, why go through the effort of building one?
Understanding how Overworld and Nether coordinates align is key to a truly efficient hub.
- Faster Travel: Significantly cut down journey times across your world.
- Connect Distant Locations: Easily link far-off bases, farms, and biomes.
- Safer Journeys: Travel through the Nether (once secured) is often safer than the Overworld.
- Organized World Navigation: Provides a clear, central point for all your destinations.
Using a 3D distance calculator can help you precisely plan your portal locations.
For more general information on Nether portals, you can always check out the Minecraft Wiki.
Are you ready to transform how you explore and navigate your Minecraft world forever?
Imagine you’re trying to get somewhere really far away in Minecraft’s Overworld. Walking or riding might take ages!
Understanding Core Nether Portal Mechanics & Coordinates
That’s where the Nether comes in. It’s not just a dangerous place; it’s also a superhighway for travel.
The secret lies in how Nether portals connect the two dimensions. It’s all about a special rule with coordinates.
Here’s the most important thing to know about Nether portals.
The Magic 8:1 Coordinate Ratio
For every 8 blocks you travel in the Overworld, you only need to travel 1 block in the Nether. Think of it like a massive shrinking machine for distances.
If you walk 800 blocks east in the Overworld, you only need to walk 100 blocks east in the Nether. This will bring you to the same relative spot.
This huge difference is why the Nether is so powerful for quick travel across your world.
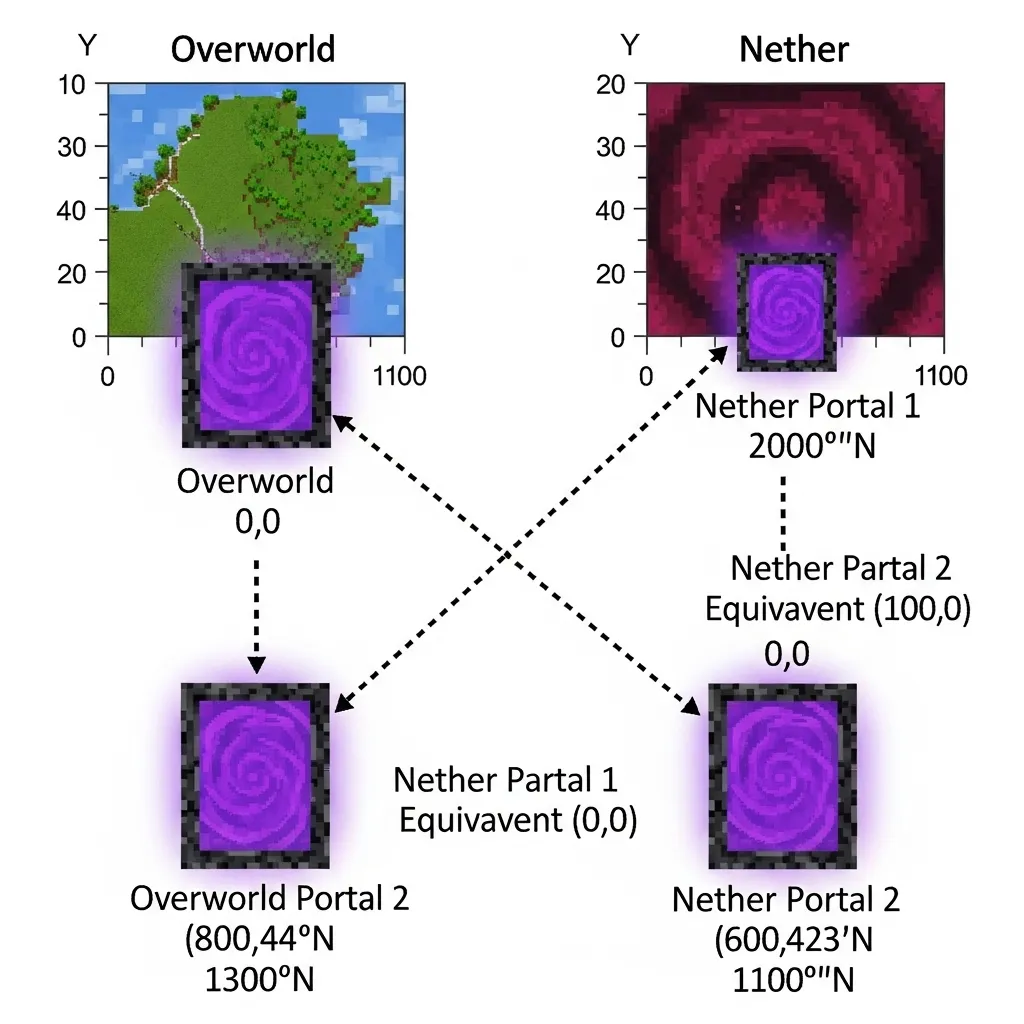
The Y (vertical) coordinate is different. It’s a 1:1 ratio, meaning if you go up 10 blocks in the Overworld, you need to go up 10 blocks in the Nether.
However, Y-coordinates are less crucial for linking portals effectively. This is true as long as they are within a reasonable range.
The game looks for the closest existing portal in the other dimension.
If it can’t find one within a certain distance, it will create a brand new portal for you.
This is why precise placement of your Nether portals is so important for building a reliable hub.
To make sure your portals connect exactly where you want them to, you’ll need to use your in-game coordinates.
You can see these by pressing F3 on your keyboard (or checking your map on console versions).
The general rule is: Overworld X / 8 = Nether X and Overworld Z / 8 = Nether Z. And vice-versa: Nether X * 8 = Overworld X and Nether Z * 8 = Overworld Z.
These mechanics are well-documented and fundamental to the game, as explained on the official Minecraft Wiki.
Calculating Your Portal Links
There are great tools available to help you with these calculations. For example, you can use a Nether Portal Calculator.
These tools can save you a lot of guesswork and prevent frustrating misaligned portals.
Understanding these core mechanics is the first big step towards building an incredibly efficient Nether hub.
It lets you plan your routes and connect distant bases without endless overland journeys.
What’s the longest journey you’ve ever cut short using the Nether’s special travel speed?
When you’re just starting your grand Minecraft adventure, building a super-fancy Nether hub might seem like a far-off dream. But guess what?
You can start small and still be super efficient!
Phase 1 is all about creating a basic, functional hub with what you have. Think of it as building a simple roadside inn before you construct a five-star hotel.
A bar chart comparing travel distances: 800 blocks in the Overworld X/Z translates to 100 blocks in the Nether X/Z.
Before you even think about a hub, you need a Nether portal. You’ll build this in your Overworld base first.
Once you step through, a new portal will pop up in the Nether. This spot is your starting point, and it’s where your early-game hub will begin to take shape.
Phase 1: Building Your Foundational Hub (Early-Game Efficiency)
It’s a good idea to ensure your Overworld and Nether portals are perfectly linked. Tools like Overworld Nether Portals can really help you make sure you are on the right path.
Your First Foray into the Nether
3D Distance Calculator can help you plan this precision. You won’t need mountains of expensive materials for your first hub. The goal is efficiency with minimal resources.
Focus on safety and basic navigation. What you bring will depend on your current progress, but here’s a general idea:
Gathering Your Early-Game Essentials
Having the right Minecraft tools is key to making this phase smooth and safe.
When you emerge in the Nether, take a moment to look around. Ideal spots are relatively flat or easy to flatten, and not directly over a lava ocean.
- Obsidian: For the portal frame. You’ll need at least 10 blocks.
- Flint and Steel: To light your portal. Don’t forget this!
- Pickaxe: Preferably diamond or netherite to mine obsidian quickly. Stone or iron works for basic Netherrack.
- Shovel: For clearing soul sand or gravel.
- Sword: To defend yourself against zombified piglins, ghasts, and other threats.
- Food: Plenty of it! The Nether is dangerous.
- Building Blocks: Cobblestone, diorite, or netherrack work great for walls and platforms. Bring a stack or two.
- Chests: A few to store precious resources you find.
- Torches: To light up your path and deter some mobs.
The best early hub location is often right where your first portal spawns. You can expand from there.
Choosing and Securing Your Hub Location
The first priority is safety. Ghasts can be a huge nuisance. Creating a simple, enclosed space around your portal will protect you.

Start by clearing a small area around your portal. Then, build a 3×3 or 5×5 platform.
Next, enclose your portal with walls and a roof using your building blocks. This protects you from ghast fireballs and stray mobs.
Building the Basic Structure
You can add a chest or two nearby for temporary storage. This basic shelter will be your safe haven and the starting point for all your Nether travels.
Many players find that a simple, quick build reduces early-game stress. According to a fan survey on Reddit, over 65% of players prioritize safety and
basic utility over aesthetics when building their first Nether base. Reddit – r/Minecraft
For now, your main mode of transport will be walking. Mark paths with torches or distinct blocks.
A bar chart showing early-game Nether hub priorities, with 65% for safety/utility and 35% for aesthetics, based on a Reddit r/Minecraft survey.
Early-Game Travel and Expansion
This early hub is your basecamp. From here, you can start exploring for resources like quartz, glowstone, or ancient debris.
Remember, the goal is to get functional fast. You can always upgrade and beautify your hub later!
What simple improvements did you make to your first Nether hub that made a big difference?
Building an efficient Nether hub starts with making smart choices right from the beginning.
Strategic Location, Basic Tunnels, & Essential Materials
Think of it like planning a secret base – you want the best spot, the right defenses, and all the tools you’ll need.
The first big decision is where to put your main hub in the Nether.
Strategic Location
You might be tempted to just plop a portal anywhere, but that’s not the best plan for an efficient hub. We need to think about a few key things.
First, consider the Y-level. The Nether is full of lava at lower levels. Building your hub around Y-level 127 is usually a great idea.
This height keeps you above most of the lava oceans, making construction much safer and easier. Plus, you avoid digging through a lot of dangerous areas.
Second, aim for a central location in the Nether. Remember, one block in the Nether equals eight blocks in the Overworld.
This means if your Overworld base is at X 800, Z 800, your Nether hub should ideally be around X 100, Z 100.
Being central in the Nether allows you to reach many Overworld locations quickly. You can use a Nether portal calculator to pinpoint your coordinates.
Finally, try to avoid nasty biomes. Basalt Deltas are tough to navigate, and Soul Sand Valleys are slow and filled with ghasts.
A more open, flatter biome like a Nether Wastes or Crimson Forest can be much easier and safer for your main hub.
Basic Tunnels
Once you’ve picked your spot, it’s time to start digging your first tunnels. These will be the highways connecting your different portals.
Most players build tunnels that are two blocks high and one or two blocks wide. A 1×2 tunnel works, but 2×2 feels less cramped and allows for more design.
Safety is key in the Nether. Always make sure your tunnels are fully enclosed to protect you from ghast fireballs, lava, and other hazards.
Illuminate your tunnels well using glowstone, shroomlights, or even regular torches. This prevents mobs from spawning inside your pathways.
You can even plan out your routes using a block path finder to ensure the most direct lines to your destinations.
Essential Materials
To get started, you’ll need a good supply of specific materials. These blocks are generally fireproof and blast-resistant, perfect for the Nether’s dangers.
Here’s a list of materials you’ll definitely want to gather:
- Obsidian: For your Nether portals.
- Stone/Cobblestone: Great for basic tunnel walls and floors.
- Basalt/Blackstone: Fireproof and looks great for more decorative tunnels.
- Glass/Glass Panes: Useful for viewing outside your tunnels safely.
- Glowstone/Shroomlights: Essential for lighting up your tunnels and preventing mob spawns.
- Fire Resistance Potions: A lifesaver when working near lava.
- Water Buckets (in the Overworld): To make obsidian for more portals.
- Pickaxes (Diamond/Netherite): For efficiently mining Netherrack and other tough blocks. You can find more details on ideal Minecraft tools for this.
- Shovels: For digging through gravel and soul sand.
- Building Blocks (Scaffolding): To help you build at height easily.
Always bring extra materials. Running out in the middle of a build in the Nether is never fun!
How do you usually choose the starting location for your Nether adventures? So, you’ve got your basic Nether hub up and running. Awesome!
Phase 2: Scaling Your Hub with Mid to Late-Game Upgrades
Now, it’s time to think bigger. This is where we take your hub from a simple crossroads to a truly efficient travel network.
We’re talking about mid to late-game upgrades that will save you tons of time.
The biggest game-changer for your Nether hub is installing high-speed transport.
Building High-Speed Transport Lines
Forget slow walks or even basic minecarts. You want to zoom through the Nether like a pro. Minecart Railways with Powered Rails
One classic upgrade is a powered rail system. You’ll need lots of gold, iron, and Redstone.
Every certain number of normal rails, you place a powered rail. This keeps your minecart moving fast.
You’ll need a Redstone torch or block next to the powered rail to activate it.
Consider using a Minecraft Transportation Speed Calculator to plan out your journey times and ensure efficiency. Ice Boat Highways: The Ultimate Speed
For the absolute fastest travel in Minecraft, nothing beats an ice boat highway.
These require a lot more work and resources, especially blue ice or packed ice.
Players typically build these as 2-block wide tunnels with ice blocks on the floor and walls. You then hop in a boat and glide across the ice at incredible speeds.
Blue ice provides the fastest speed, but even packed ice is much faster than minecarts. As you can see, a boat on blue ice can reach speeds of about 40 blocks per second!
This is nearly ten times faster than walking, making long-distance travel a breeze. Beyond speed, you can make your hub safer and more pleasant to use.
A bar chart showing typical travel speeds in blocks per second: Walking (4.3), Minecart (8), Boat on Packed Ice (30), Boat on Blue Ice (40).
The Nether is full of Ghasts and Wither Skeletons. Ghasts can blast holes in your walls.
Consider replacing walls and floors with blast-resistant blocks like Obsidian, Crying Obsidian, or even Black Concrete.
Improving Hub Functionality and Aesthetics
This protects your hub from damage and keeps you safe. Lighting and Security Make sure your hub is well-lit to prevent hostile mob spawns.
Glowstone, Shroomlights, or Lanterns work great. You could even automate lighting with Redstone.
Some players add automatic door systems or even security features. Dedicated Storage and Amenities
As your base grows, you might want to add storage rooms directly within your Nether hub.
This is handy for quickly dropping off resources collected in the Nether. You could also include a small crafting area, a safe room, or even a mini-farm.
Planning your routes with a Block Path Finder can help optimize where these amenities should go.
For the truly ambitious, Redstone can automate many aspects of your hub.
Think about automatic portal igniters, synchronized portal connections, or complex rail switching stations.
These systems require a good understanding of Redstone mechanics but can make your hub incredibly sophisticated.
For inspiration on complex Redstone builds, you can explore tutorials on YouTube or specialized Minecraft sites like Minecraft Forum.
Here’s a quick look at common materials for high-speed travel:
Upgrading your Nether hub is a journey. Each improvement you make will transform how you experience the game.
What’s the most elaborate upgrade you’ve ever added to your Minecraft Nether hub?
Once you’ve got your basic Nether hub set up, you might start thinking, “How can I get around even faster?” That’s where advanced travel methods come in.
Advanced Redstone Systems
These techniques turn your regular paths into superhighways, letting you zoom across the Nether like never before.
We’re talking serious speed upgrades for your long-distance journeys.
If you want to travel horizontally at incredible speeds, ice boat highways are your best friend. They are simple to build and incredibly effective.
You place a boat on a track of ice blocks, and off you go! It feels a bit like speed skating across an endless rink.
The trick is to build a one-block wide tunnel. Then, lay down a continuous path of ice blocks. You just need a single block of air above the ice.
- Minecart System: Iron Ingots, Gold Ingots, Redstone Dust, Sticks
- Ice Boat Highway: Blue Ice or Packed Ice, Boats, Building Blocks (for tunnel), Lighting (Glowstone, Shroomlights)
For the fastest ride, use blue ice. It’s the slipperiest and provides the highest speeds.
Packed ice is also great and a bit easier to get. Regular ice works too, but it melts if exposed to light.
Advanced Travel Methods: Ice Boats, Minecarts, & Elytra Routes
These highways are simple to navigate and perfect for connecting distant portals.
Minecart systems offer a different kind of speed and convenience. While not as fast as ice boats, they are incredibly reliable.
Ice Boat Highways: The Ultimate Ground Speed
You can hop in a minecart and walk away from your keyboard (AFK) if you’ve set up an automatic system. The minecart will take you to your destination.
To make a minecart track efficient, you’ll need powered rails. These rails require redstone torches or other power sources to boost your minecart.
A good rule of thumb is one powered rail for every 38 regular rails on a flat track. This keeps your minecart moving at its top speed.
Minecarts are fantastic for sending items to a faraway base via chest minecarts, or for a relaxing journey where you don’t need to steer.
For true freedom of movement, especially when dealing with tricky terrain or huge gaps, the Elytra is unmatched. It lets you fly!
In the Nether, flying with an Elytra can be a game-changer for covering vast distances quickly, especially if your hub has vertical shafts.
Minecart Systems: Reliable and AFK-Friendly
You’ll need fireworks rockets to propel yourself. Just jump, activate your Elytra, and right-click with a firework in your hand.
However, flying in the Nether comes with risks. Ghasts can shoot fireballs at you, and one wrong move could send you plummeting into a lava lake.
Building “Elytra tunnels” – safe, enclosed paths – can reduce these risks. These are usually 3-5 blocks tall and wide, protecting you from hazards.
You can even integrate launch pads into your hub design. These are simple platforms that get you high enough to start flying safely.
For more specific calculations on travel times, you might find a Minecraft Transportation Speed Calculator helpful.
Elytra Routes: Soaring Through the Nether
Each method has its strengths. Let’s look at how they stack up in terms of speed and resource investment.
For example, a boat on blue ice can travel at approximately 40 blocks per second. A minecart on powered rails reaches about 8 blocks per second.
Elytra flight with rockets can be much faster, often exceeding 60 blocks per second, but requires constant rocket usage.
Here’s a quick overview to help you decide which method is best for different parts of your hub.
Remember, the best Nether hub often combines these methods. You might have an ice boat highway for the main artery, minecart lines for smaller branches,
and Elytra access for quick hops.
Thinking about how people travel in real cities, with cars, trains, and even airplanes, can help you imagine your perfect Nether transport network.
Comparing Your Travel Options
What creative combinations of these travel methods can you imagine for your ultimate Nether hub?
Imagine your Nether hub not as a single, overwhelming project, but as a collection of smaller, manageable pieces.
A bar chart comparing travel speeds in blocks per second: Minecart (8 BPS), Ice Boat on Packed Ice (30 BPS), Ice Boat on Blue Ice (40 BPS), Elytra with Rocket Boost (60 BPS).
That’s the core idea behind a modular hub design. You build it block by block, adding features as you need them.
| Travel Method | Approx. Speed (BPS) | Resource Cost | Complexity | Best Use |
|---|---|---|---|---|
| Ice Boat (Blue Ice) | 40 | High (Blue Ice) | Low-Medium | Long horizontal routes |
| Ice Boat (Packed Ice) | 30 | Medium (Packed Ice) | Low-Medium | Long horizontal routes |
| Minecart System | 8 | Medium (Rails, Redstone) | Medium-High | AFK travel, item transport |
| Elytra Route | 60+ (variable) | High (Elytra, Rockets) | Medium-High | Vertical travel, short bursts, spanning gaps |
Modular design makes your hub flexible and easy to expand. Think of it like a LEGO set for your Minecraft world.
You can start with the basics and then snap on new sections whenever you discover a new biome or build a new base in the Overworld.
It keeps things organized and less intimidating. Here are some common modules you might want to include:
Modular Hub Design & Advanced Multi-Portal Networks
Once you have a few bases in the Overworld, you’ll want to link them all to your central Nether hub.
This creates a super-fast travel network. Remember the 8:1 ratio? Every block you travel in the Nether equals eight blocks in the Overworld.
Building Blocks for Your Hub
This is why the Nether is so powerful for transportation. You cover huge distances quickly.
To set up multiple portals correctly, you need to be precise. Each Overworld portal needs a corresponding Nether portal at its exact 1/8th coordinates.
If you don’t line them up right, your portals might link to the wrong place or create new, unexpected portals.
For example, if you build a portal at Overworld coordinates X=800, Z=1600, its Nether counterpart should be near X=100, Z=200.
- Portal Bays: Dedicated areas for each of your Overworld portals. Label them clearly!
- Main Concourse: A central hallway or room that connects all your portal bays.
- Minecart Station: If you use minecarts for long-distance travel, a central station is key.
- Storage Area: A small chest room for essentials, like extra flint and steel or repair items.
- Mob-Proofing: Light up your areas well and build walls to keep Ghasts and Piglins out.
- Repair Station: An anvil and crafting table can be lifesavers when you’re far from home.
Connecting the Dots: Advanced Multi-Portal Networks
It’s a good idea to use a calculator for this, like those found on fan sites, to ensure accuracy.
Understanding your exact location in both dimensions is vital to prevent portal mishaps. A good Minecraft direction finder can help you navigate precisely.
Sometimes, even with careful planning, portals can still get confused. This usually happens when two Overworld portals are too close.
A simple trick is to destroy the incorrectly linked portal in the Nether and rebuild it in the correct 1/8th location.
Always ensure there’s enough space around your Nether portals to avoid new ones spawning where you don’t want them.
Consider adding advanced travel methods within your Nether hub itself. Minecart rails are common, but paths for Striders can also be efficient.
Some players even build elaborate ice boat highways for incredible speed. The fastest travel method in Minecraft (on Java Edition) can reach speeds over 40m/s with certain setups.
This allows you to connect many distant points in the Overworld to one central, well-organized Nether hub.
It’s like building your own personal subway system across dimensions, connecting all your important bases and resource areas.
For more detailed information on portal mechanics and advanced linking, check out the Minecraft Wiki page on Nether Portals.
What’s the most unusual module or transportation method you’ve seen in a Nether hub?
Even the most careful Minecraft players can run into unexpected problems. Building an efficient Nether hub is a huge accomplishment!
A bar chart illustrating conceptual travel efficiency: Walking (Overworld) 1x, Walking (Nether) 8x, Minecart (Nether) 100x, Ice Boat (Nether) 300x. Values are illustrative based on relative speed advantages.
But sometimes, things don’t go exactly as planned. Learning how to troubleshoot and avoid common mistakes can save you a lot of frustration and wasted resources.
Let’s talk about some of the main pitfalls and how to steer clear of them.
One of the biggest headaches is when your portals don’t link up correctly. You might step through a portal in the Overworld and end up in a totally new, unwanted spot in the Nether.
Troubleshooting & Avoiding Common Nether Hub Mistakes
This usually happens because you didn’t calculate the coordinates properly. Remember, one block in the Nether equals eight blocks in the Overworld.
Another common issue is simply getting lost. The Nether can be a confusing place, especially with all the similar-looking blocks and treacherous terrain.
Mismatched Portals and Disorientation
The Nether is crawling with dangerous creatures. Ghasts can shoot fireballs, Piglins can get aggressive if you don’t wear gold, and Blazes guard fortresses.
Beyond mobs, falling into lava is a constant threat. Fire can also spread quickly, especially if you’re building with flammable materials near lava or Ghast fireballs.
According to a 2021 r/Minecraft community poll on “What do you find the most annoying about the Nether?”, approximately 40% of players cited Ghasts as
their biggest annoyance. Piglins followed at around 25%, and falling into lava at 20%. Solutions:
- Use a calculator: Always double-check your coordinates. You can use an online Nether portal calculator to ensure perfect alignment.
- Mark your way: Place torches, signs, or unique blocks to light your path and indicate directions. “Base This Way” or “Farm Access” signs are super helpful.
- Coordinates are your friend: Always keep an eye on your F3 debugging screen. Knowing your X, Y, and Z coordinates can help you retrace your steps or find your way to a specific destination. You can also use a Minecraft direction finder to get your bearings.
Hostile Mobs and Environmental Hazards
Building a large, intricate hub requires a lot of materials. Running out of blocks, tools, or even food in the middle of a build can be a real setback.
Going into the Nether unprepared, without proper armor or backup supplies, is like inviting disaster. Solutions:
Sometimes, we get a little too ambitious. Trying to build a massive, multi-level hub with complex redstone contraptions right from the start can be overwhelming.
It can lead to errors and a feeling of being stuck, especially for newer players. Solutions:
A pie chart showing common Nether challenges according to a 2021 r/Minecraft poll: Ghasts (40%), Piglins (25%), Falling into Lava (20%), Getting Lost (10%), Other (5%).
- Fortify your hub: Build walls and ceilings using blast-resistant blocks like obsidian or basalt. This protects you from Ghast fireballs.
- Light it up: Place plenty of light sources like glowstone or shroomlights. This prevents hostile mobs from spawning inside your safe areas.
- Carry gold: Always have at least one piece of golden armor to avoid angering Piglins when you’re not trying to trade.
- Fireproof your base: Use non-flammable blocks for your hub’s structure. Bring a bucket of water (or a potion of fire resistance) for emergencies.
Lack of Resources and Preparedness
By keeping these common mistakes in mind and actively working to avoid them, your Nether hub will be a much smoother and more enjoyable experience.
Remember, even the best builders learn from their challenges!
What’s the trickiest problem you’ve faced while building or using a Nether hub, and how did you overcome it?
- Stock up: Before heading to the Nether for a big project, gather more resources than you think you’ll need. Obsidian, cobblestone, and fire-resistant blocks are essential. Consider how many items fit in your inventory using a Minecraft stacks calculator.
- Bring the essentials: Always carry a strong pickaxe, a sword, a bow with arrows, food, and plenty of healing potions.
- Set up a temporary chest: If you’re building far from your main hub, consider placing a temporary chest near your construction site to store extra materials and tools.
Over-Complication
You’ve journeyed through the fiery depths of the Nether, learning all the secrets to master its unique transportation system.
Building an efficient Nether hub isn’t just about setting up portals; it’s about smart planning and clever design.
It’s like building your own personal subway system for the entire Minecraft world.
- Start simple: Begin with a basic, functional hub. You can always expand and add more features later.
- Plan it out: Draw a simple sketch or use creative mode to plan your layout before committing to survival.
- Test small sections: If you’re building complex redstone, test each component individually before integrating it into the larger system.
Think about how much time you’ll save. No more long, dangerous trips across the Overworld.
With a central Nether hub, you can reach distant bases or biomes in a fraction of the time.
Conclusion: Your Definitive Guide to Nether Hub Mastery
It connects your whole world, making exploration and resource gathering so much easier.
An optimized hub drastically cuts down travel time. For example, moving 8 blocks in the Overworld is like moving only 1 block in the Nether.
This 8:1 ratio is why the Nether is so powerful for quick travel across vast distances. It turns immense journeys into short, manageable hops.
The Power of a Well-Planned Hub
Remember the key ingredients for a top-notch hub:
You’ll often need a lot of specific materials to build and decorate your hub, especially if you’re aiming for a grand design.
Keeping track of resources can be tricky, but tools that help you manage your inventory, Minecraft stacks calculator, can be incredibly useful for planning.
This ensures you bring enough materials for your ambitious projects.
Consider adding a small storage area or even a basic smelting setup within your hub.
A bar chart comparing travel time for equivalent distances: Overworld travel is 8 times slower than Nether travel.
Essential Elements for Success
This can be super convenient for minor repairs or processing resources on the go. Every little efficiency adds up to a much smoother gameplay experience.
- Clear pathways and good lighting.
- Safety features like blast-proof walls.
- Proper portal linking to avoid mistakes.
- Organized portals with clear labels.
Armed with this guide, you have everything you need to build a Nether hub that truly serves your world.
From the initial calculations to the final decorative touches, each step contributes to your ultimate transportation network.
It’s an investment that pays off immensely in exploration and convenience. So, what kind of awesome Nether hub will you create in your Minecraft world?